- Square footage
- Typical small landing hallway
- Cost
- Under $700 total
- Difficulty
- Weekend DIY with one paint step
- Renter-safe
- Not fully renter-safe (shelves/sconces vary)
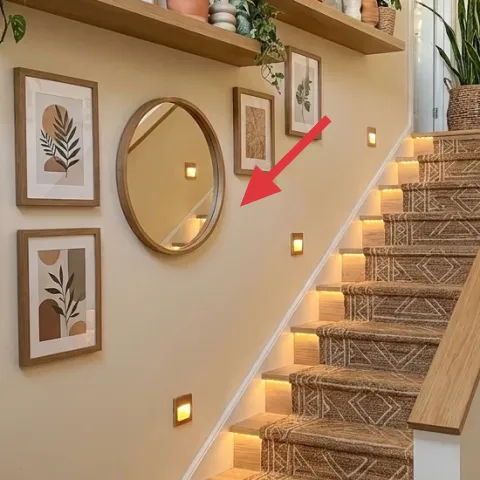
Why warm beige-and-wood staircase landing decor is the staircase landing of 2026
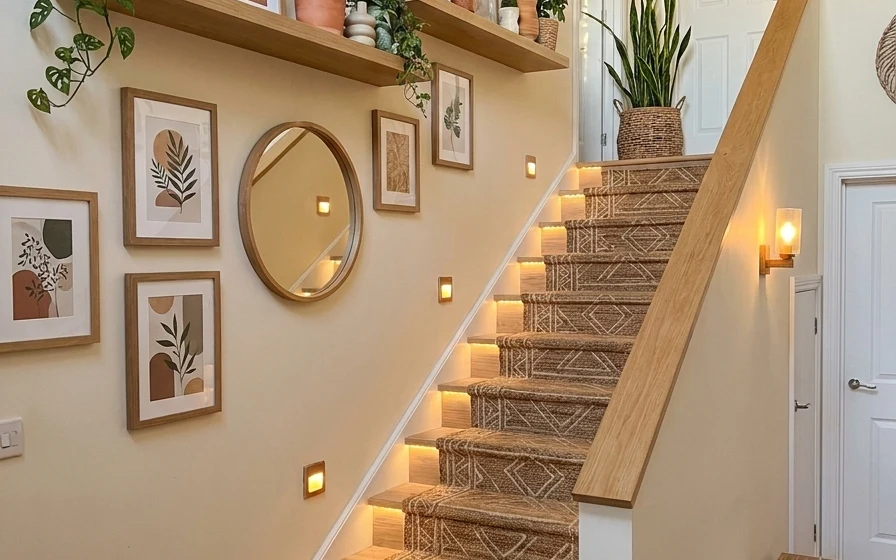
This photo proves that a narrow staircase can still read as a “room,” not a hallway. The look stacks warm light from brass wall sconces, a grounded patterned stair runner, and two wood floating shelves that give the plants somewhere to live without crowding the steps. You can see the mix of matte wall paint, textured woven baskets, and the flat-but-not-boring geometry of the runner. For homeowners, the smartest part is choosing the fixes with the biggest visual payoff—sconces, mirror, and shelves—then styling in layers so it doesn’t look like random decor.
I almost overdecorated the wall at first—more frames felt like the right answer until the hallway started looking busy instead of calm. What changed my mind was stepping back and noticing how the mirror and shelf lines create a “pause” while the runner leads your eye up the stairs. Once I treated plants like the finishing layer (not the main layer), the whole landing felt balanced.
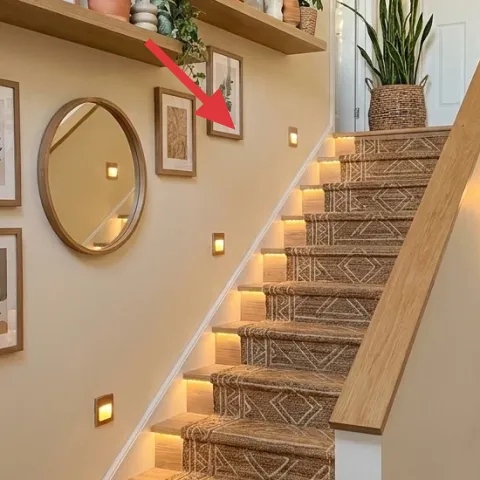
Layer 1 — Framed botanical print ($25) on the left wall
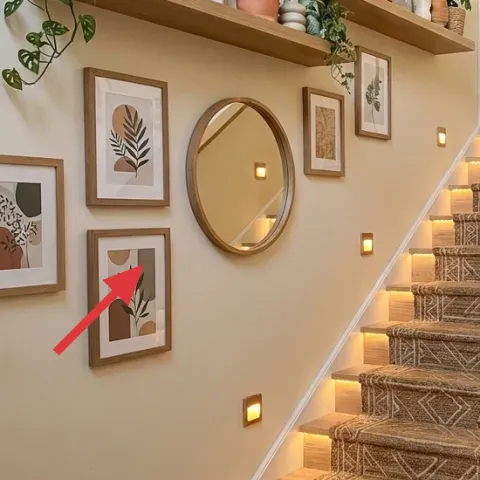
One framed botanical print anchors the left wall and gives the plants something to “talk to” in terms of color and shape. I like starting with a single mid-size frame because it keeps spacing more predictable than lining up a bunch at once. The print’s warm wood-tone mat and leafy illustration echo the greenery on the shelves, so it feels cohesive instead of pasted on. If a full cluster feels too intense for a weekend, add one frame first, measure twice, then decide whether you want symmetry (like this landing) or an art-lean style.
Measure frame spacing before hanging
Use painter’s tape outlines and check eye-level height from the bottom of the stairs, not from the wall itself.
Layer 2 — Woven basket ($30) for shelf texture
A woven basket on the shelf brings in the kind of texture that makes neutral walls feel lived-in. Here, it sits near the larger plant cluster, so it reads as part of the styling rhythm rather than a stray accessory. The trade-off is that woven pieces collect a little dust, but the payoff is a softer look than a plain pot—and it helps the scene feel curated even when the plants grow a bit. Choose a basket with a tight weave so it doesn’t look flimsy, and keep the color in the warm-beige family to match the wall.
Keep the weave color in the same warm range
When baskets match the wall’s undertone, the shelves look intentional instead of random.
Layer 3 — Small indoor plants in pots ($25) for a layered green look
Small plants in pots are the “glue” layer that connects the big statement leaves to the wall art. In a tight landing, scale matters: you want different leaf sizes close together, but not so many small pots that the shelves feel cluttered. These little pots create visual checkpoints that guide the eye across the shelf and down toward the stairs. The choice to style with smaller plants is deliberate—rather than buying one huge specimen everywhere, you can distribute attention and make the whole wall feel fuller.
Vary leaf shapes, not just pot colors
Mix broad leaves and thinner blades so the shelf reads dynamic from the bottom step.
Layer 4 — Oval wall mirror ($120) DIY-painted frame
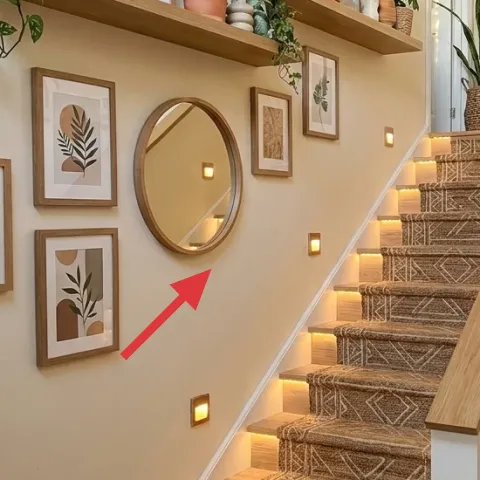
An oval mirror breaks up the straight stair lines and adds a reflective “light bounce” effect, which matters in a staircase. The shape also complements plant leaves better than a strict rectangle. I’d rather refresh what you can see—because even a basic mirror becomes the focal point when the frame color matches the brass in the sconces. Here’s the DIY angle: repaint the frame so it sits in the same warm-metal family as the lighting, and the landing stops looking like separate purchases.
Make it instead of buying it
Spray-paint the oval mirror frame warm-metal so it matches the brass sconces and looks built-in.
Materials
- Sandpaper (120–220 grit) — 1 pack — $6
- Painter’s tape and paper — 1 kit — $10
- Degreasing cleaner — 1 bottle — $8
- Metal primer — 1 can — $12
- Warm brass spray paint — 1 can — $18
Steps
- Clean the frame thoroughly with degreasing cleaner.
- Lightly sand to rough up the surface for better paint grip.
- Tape off the glass edge so paint stays off the mirror.
- Wipe away dust with a dry cloth.
- Apply metal primer in thin, even coats.
- Let primer dry fully per the can instructions.
- Spray the warm brass color in light passes to avoid drips.
- Allow paint to cure fully before reinstalling.
Total DIY cost: $54 — saves about $66 over buying.
Don’t paint too heavy or it will look dusty
Thin coats look smoother and make the frame catch the sconce glow instead of chalking over.
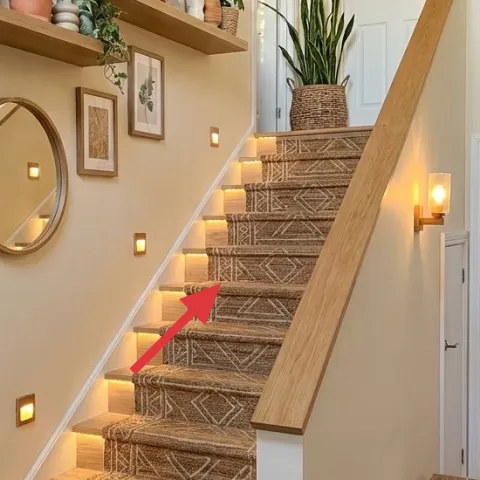
Layer 5 — Brass wall sconce ($60) warm ambient light
Brass wall sconces do two jobs in a staircase landing: they brighten the path and they add an intentional focal rhythm along the wall. Because this space is long and narrow, you’ll feel the difference immediately compared to relying only on overhead light. The warm glow complements the honey tones in the wood shelves and stairs, while the metal finish coordinates with the mirror-frame DIY. The trade-off is installing a fixture can be harder than swapping decor—so if wiring is involved, plan for a quick electrician consult and treat the rest as the weekend part of the project.
Aim for warm bulbs
2700K-ish bulbs help brass and wood read cohesive instead of yellow-green.
Layer 6 — Wood floating shelf ($180) for plants and styling
Floating shelves turn blank wall space into usable vertical storage for plants and small decor, which is exactly what a staircase landing needs. Two shelves also create a “stacked” look that echoes the stair steps—your eye naturally moves up and across instead of hitting one flat surface. This is the choice I’d make over buying a freestanding console because it doesn’t steal floor area from the steps. The downside is alignment: small leveling errors look extra noticeable in a corridor. Go slow, use a level, and keep the shelf ends parallel to the trim lines.
Style shelves from heavy to light
Start with taller plants, then add baskets, then finish with small pots so nothing blocks anything.
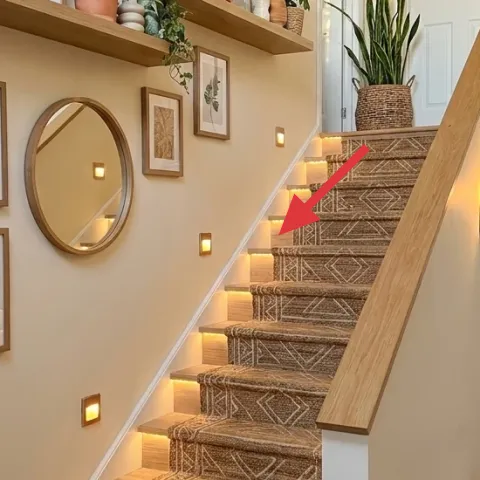
Layer 7 — Patterned stair runner ($250) to anchor the whole landing
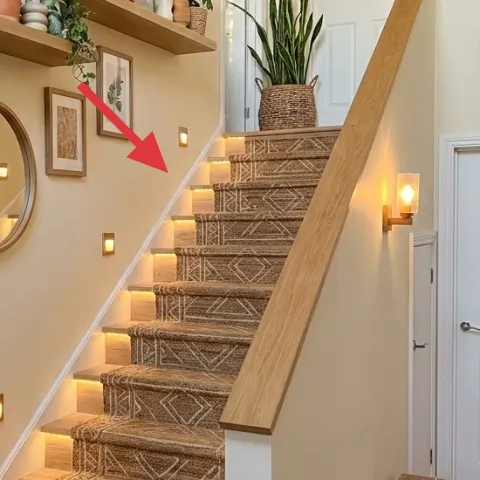
A patterned stair runner gives the landing structure and makes the stairs feel like a designed “strip,” not just stairs. The geometric motif here adds movement without fighting the botanical wall art, and the neutral tones keep the plants from becoming the only color source. The trade-off is measuring and fitting: a runner needs careful cut-to-fit or professional installation if it won’t be taped down safely. If the staircase is slightly uneven, test placement first before locking it in, then keep vacuuming routines gentle so the fibers don’t shed.
Use the right grip method
Skip flimsy adhesives; runners need a secure, safe hold to prevent shifting on steps.
The cost, layer by layer
| Layer | Item | Cost |
|---|---|---|
| 1 | Framed botanical print | $25 |
| 2 | Woven basket | $30 |
| 3 | Small indoor plants in pots | $25 |
| 4 | Oval wall mirror (DIY-painted frame) | $120 |
| 5 | Brass wall sconce | $60 |
| 6 | Wood floating shelf | $180 |
| 7 | Patterned stair runner | $250 |
| Total | $690 | |
If you want a cheaper variant, pick one shelf instead of two and swap the patterned runner for a simpler neutral runner with a closer-to-wall palette. You can keep the oval mirror and brass sconces for the warm light, then add plants gradually as budget allows.
What worked, what didn't (across the whole room)
The strongest win was stacking warm light, reflective bounce, and textured greenery so the landing feels like it belongs in the rest of the home. The runner’s pattern also keeps everything from reading flat, especially near the stair treads. A few choices were touchy—mainly spacing and scale—so the “final” look only happened once the wall art and shelf items were edited.
What worked
- The oval mirror adds reflection right where you pause at the landing, making the wall feel brighter.
- Brass wall sconces create warm pools of light that flatter wood, metal, and plant leaves.
- Wood floating shelves turn vertical space into styling space without blocking movement on the steps.
- Woven baskets soften the look and add texture that doesn’t clash with botanical art.
- The patterned stair runner anchors the staircase and visually ties the wall styling together.
- Mixing plant scales (big leaves plus small potted plants) keeps the wall from looking one-note.
What didn't
- Too many small pots on the top shelf crowded the sightline and made the landing feel cluttered.
- Hanging frames without a consistent height reference looked “tilted” from the bottom step view.
- Placing the runner before confirming final alignment made the pattern feel off by a few inches.
- Using cooler bulbs would have made the brass read harsher and less cohesive with the wood tones.
What we'd skip if we did it again
Skip adding more frames once the left wall already has a clear hierarchy. In a narrow landing, extra art can steal focus from the mirror and shelves, which are doing the heavy lifting for layout and light.
Skip random pot colors that don’t echo the brass and wood. If the styling is already warm beige and light wood, keeping pots in similar tones makes the whole shelf feel edited.
Skip a runner install before double-checking grip and alignment. A runner that shifts even slightly turns a “designed” staircase into a daily annoyance, so measure placement and test the hold first.
Frequently asked
How long does a staircase landing refresh like this take?
Plan for one weekend if you keep the moves simple: hang the mirror, mount the shelves, install (or place) the runner, and finish with art and plant styling. The DIY mirror-frame paint is usually the buffer—drying and curing time pushes it a bit. If you need help with wiring for the sconces, that can add half a day depending on scheduling.
What if my home is a rental—can I copy this look?
For rentals, you can still recreate the styling: use framed botanical prints, plants, and a mirror (depending on what you’re allowed to hang). Choose a no-drill wall option for decor, and swap permanent fixtures for plug-in lighting if sconces aren’t possible. The stair runner is often the most difficult part for renters, so look for secure, non-damaging installation methods.
My staircase is wider or narrower—how do I scale the layout?
Use the mirror and shelf lines as your scale anchors. If the landing is wider, add one extra plant pot per shelf and increase frame spacing slightly. If the landing is narrower, keep to fewer items on the shelves and rely more on texture (woven baskets) and warm light to fill the space without crowding.
Where should I shop for the runner and shelves on a budget?
For a stair runner, look for a neutral patterned runner or a flatweave area rug you can fit using a safe non-shifting method. For shelves, consider ready-to-install floating shelf kits, then match the wood tone to your stairs. Framed botanical prints can be mixed from a single brand family so mats and tones stay cohesive.
What’s the biggest mistake people make in a staircase decor plan?
The most common miss is hanging art and shelves without checking sightlines from the bottom step. Because you view the landing from multiple angles, small spacing errors become obvious. Another frequent issue is adding too many small pots—plants look best when big leaves are balanced by a smaller number of smaller accents.