
- Best for
- Instantly changing the vanity zone
- Cost
- Under $1,000
- Time
- A focused weekend (plus dry time)
- Renter-safe
- Yes, if you use removable wallpaper and no wiring swaps
Why a gray wallpaper-and-mirror setup is the bathroom vanity nook of 2026
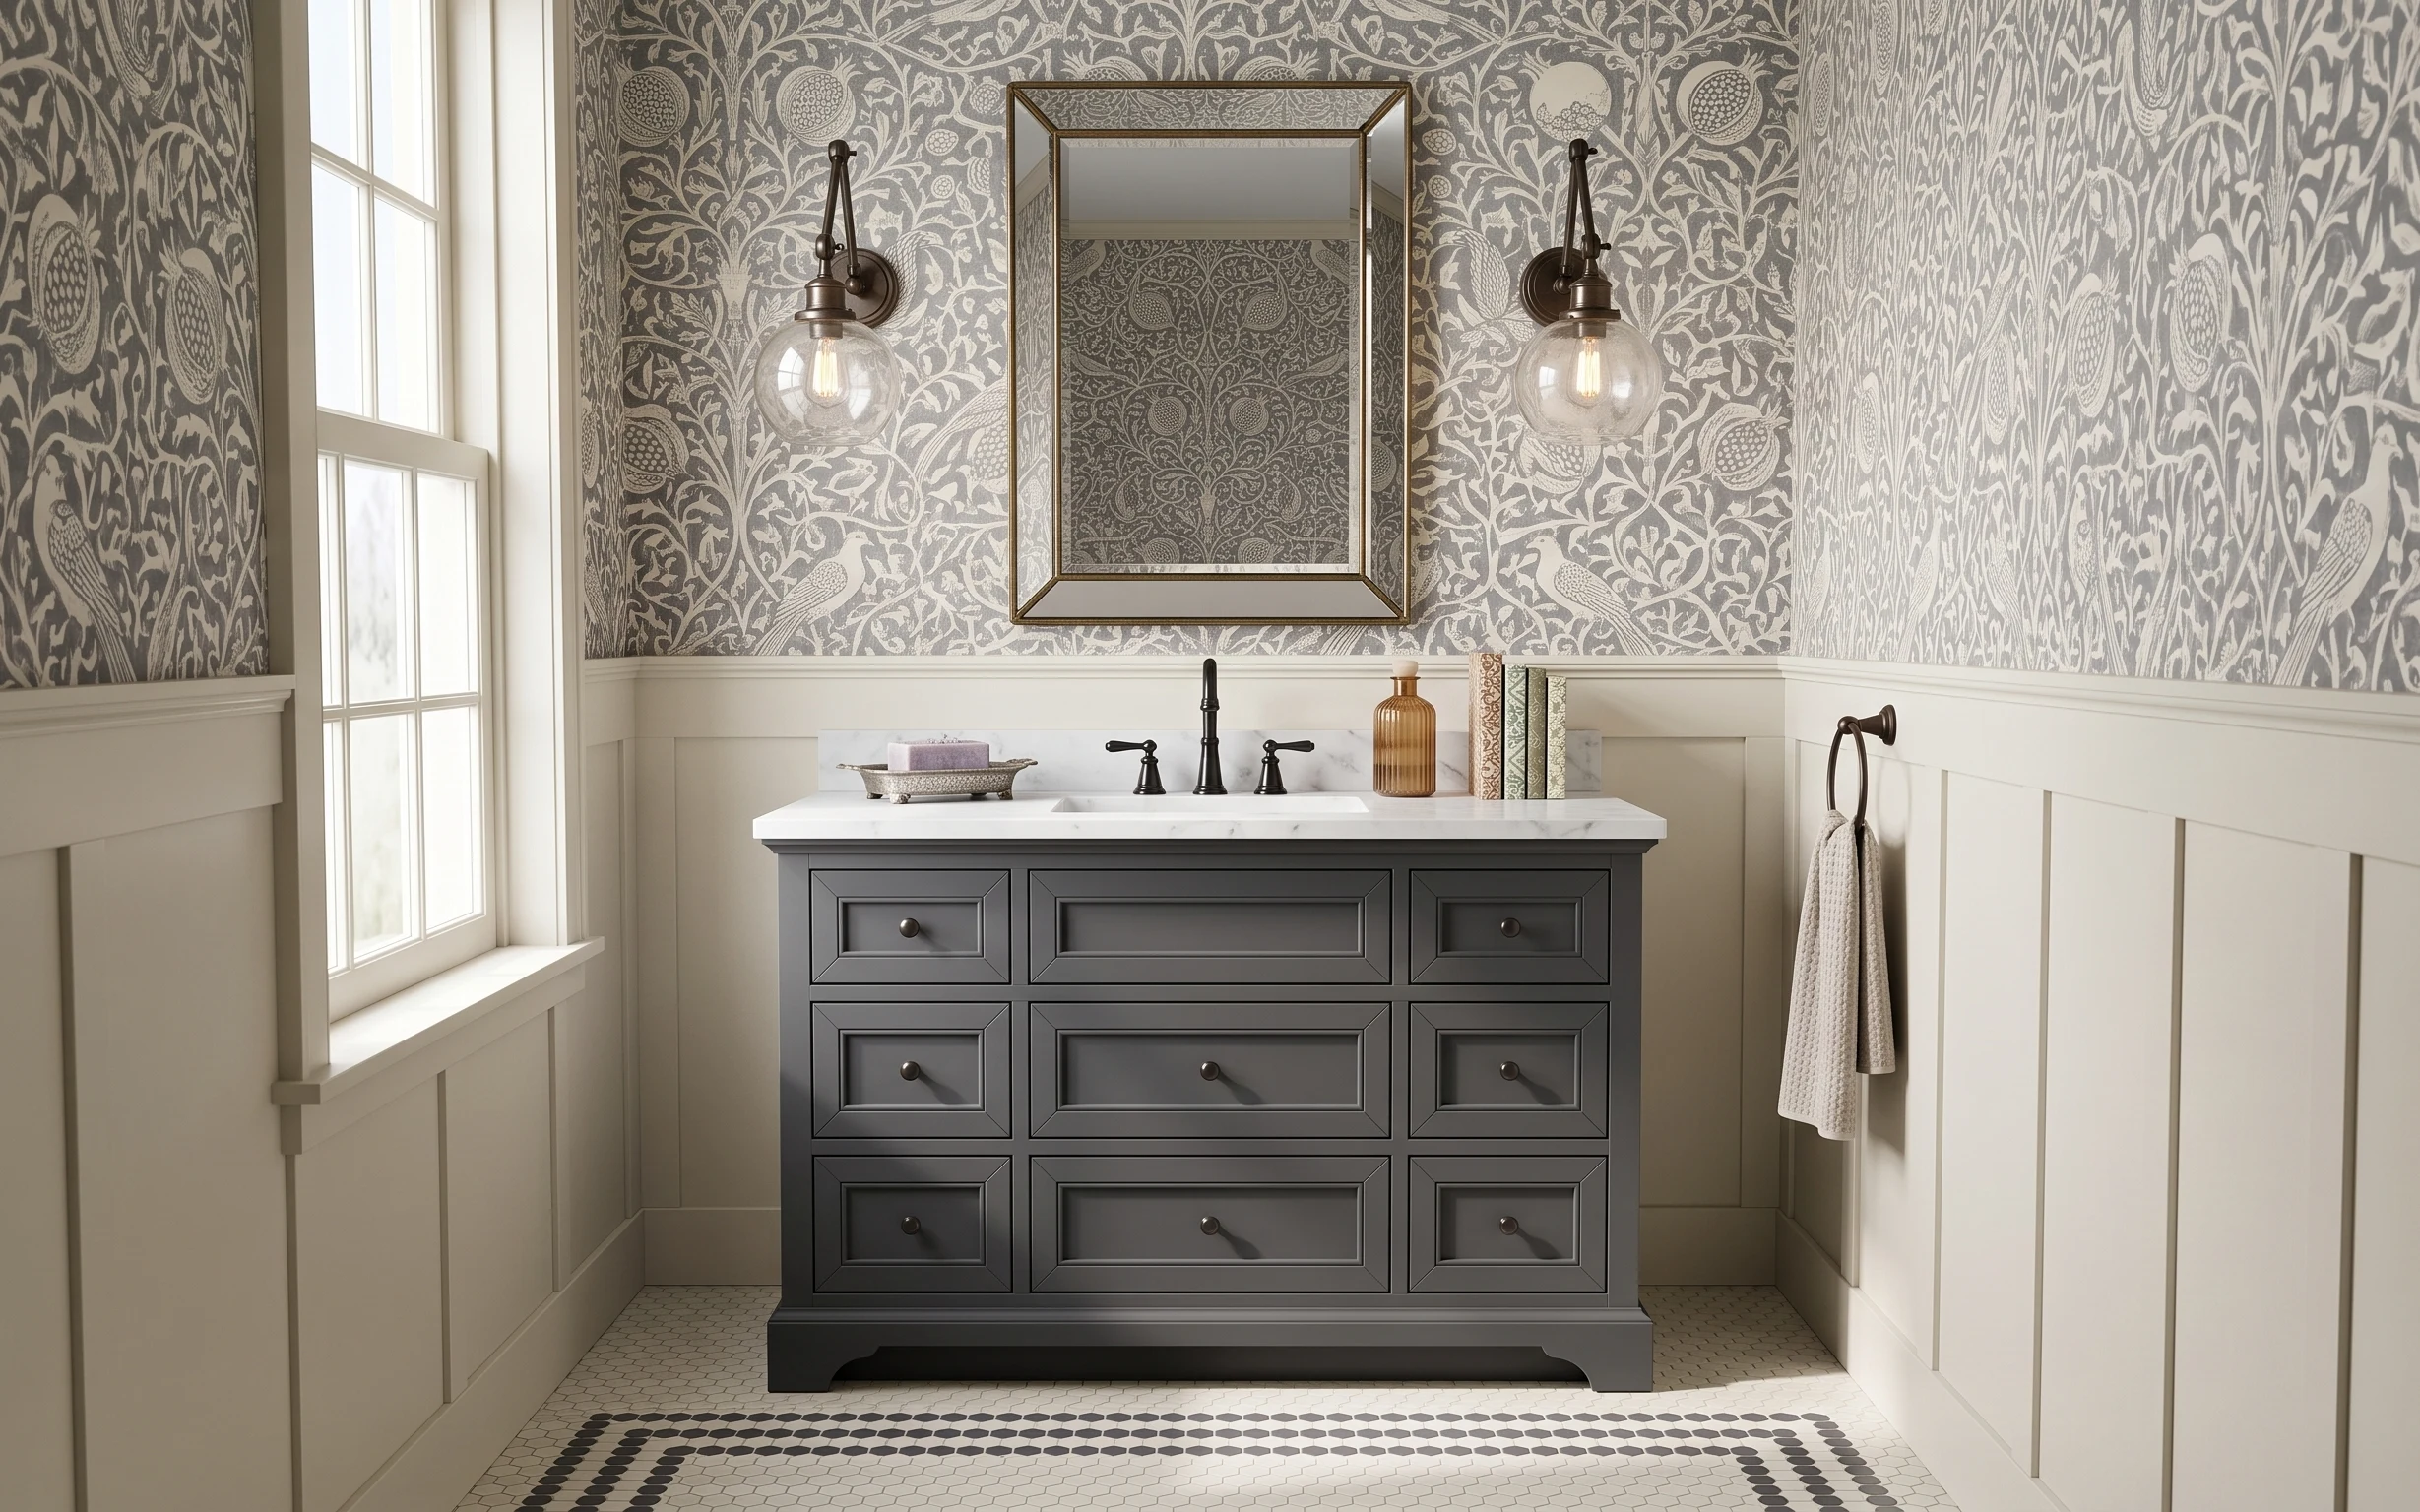
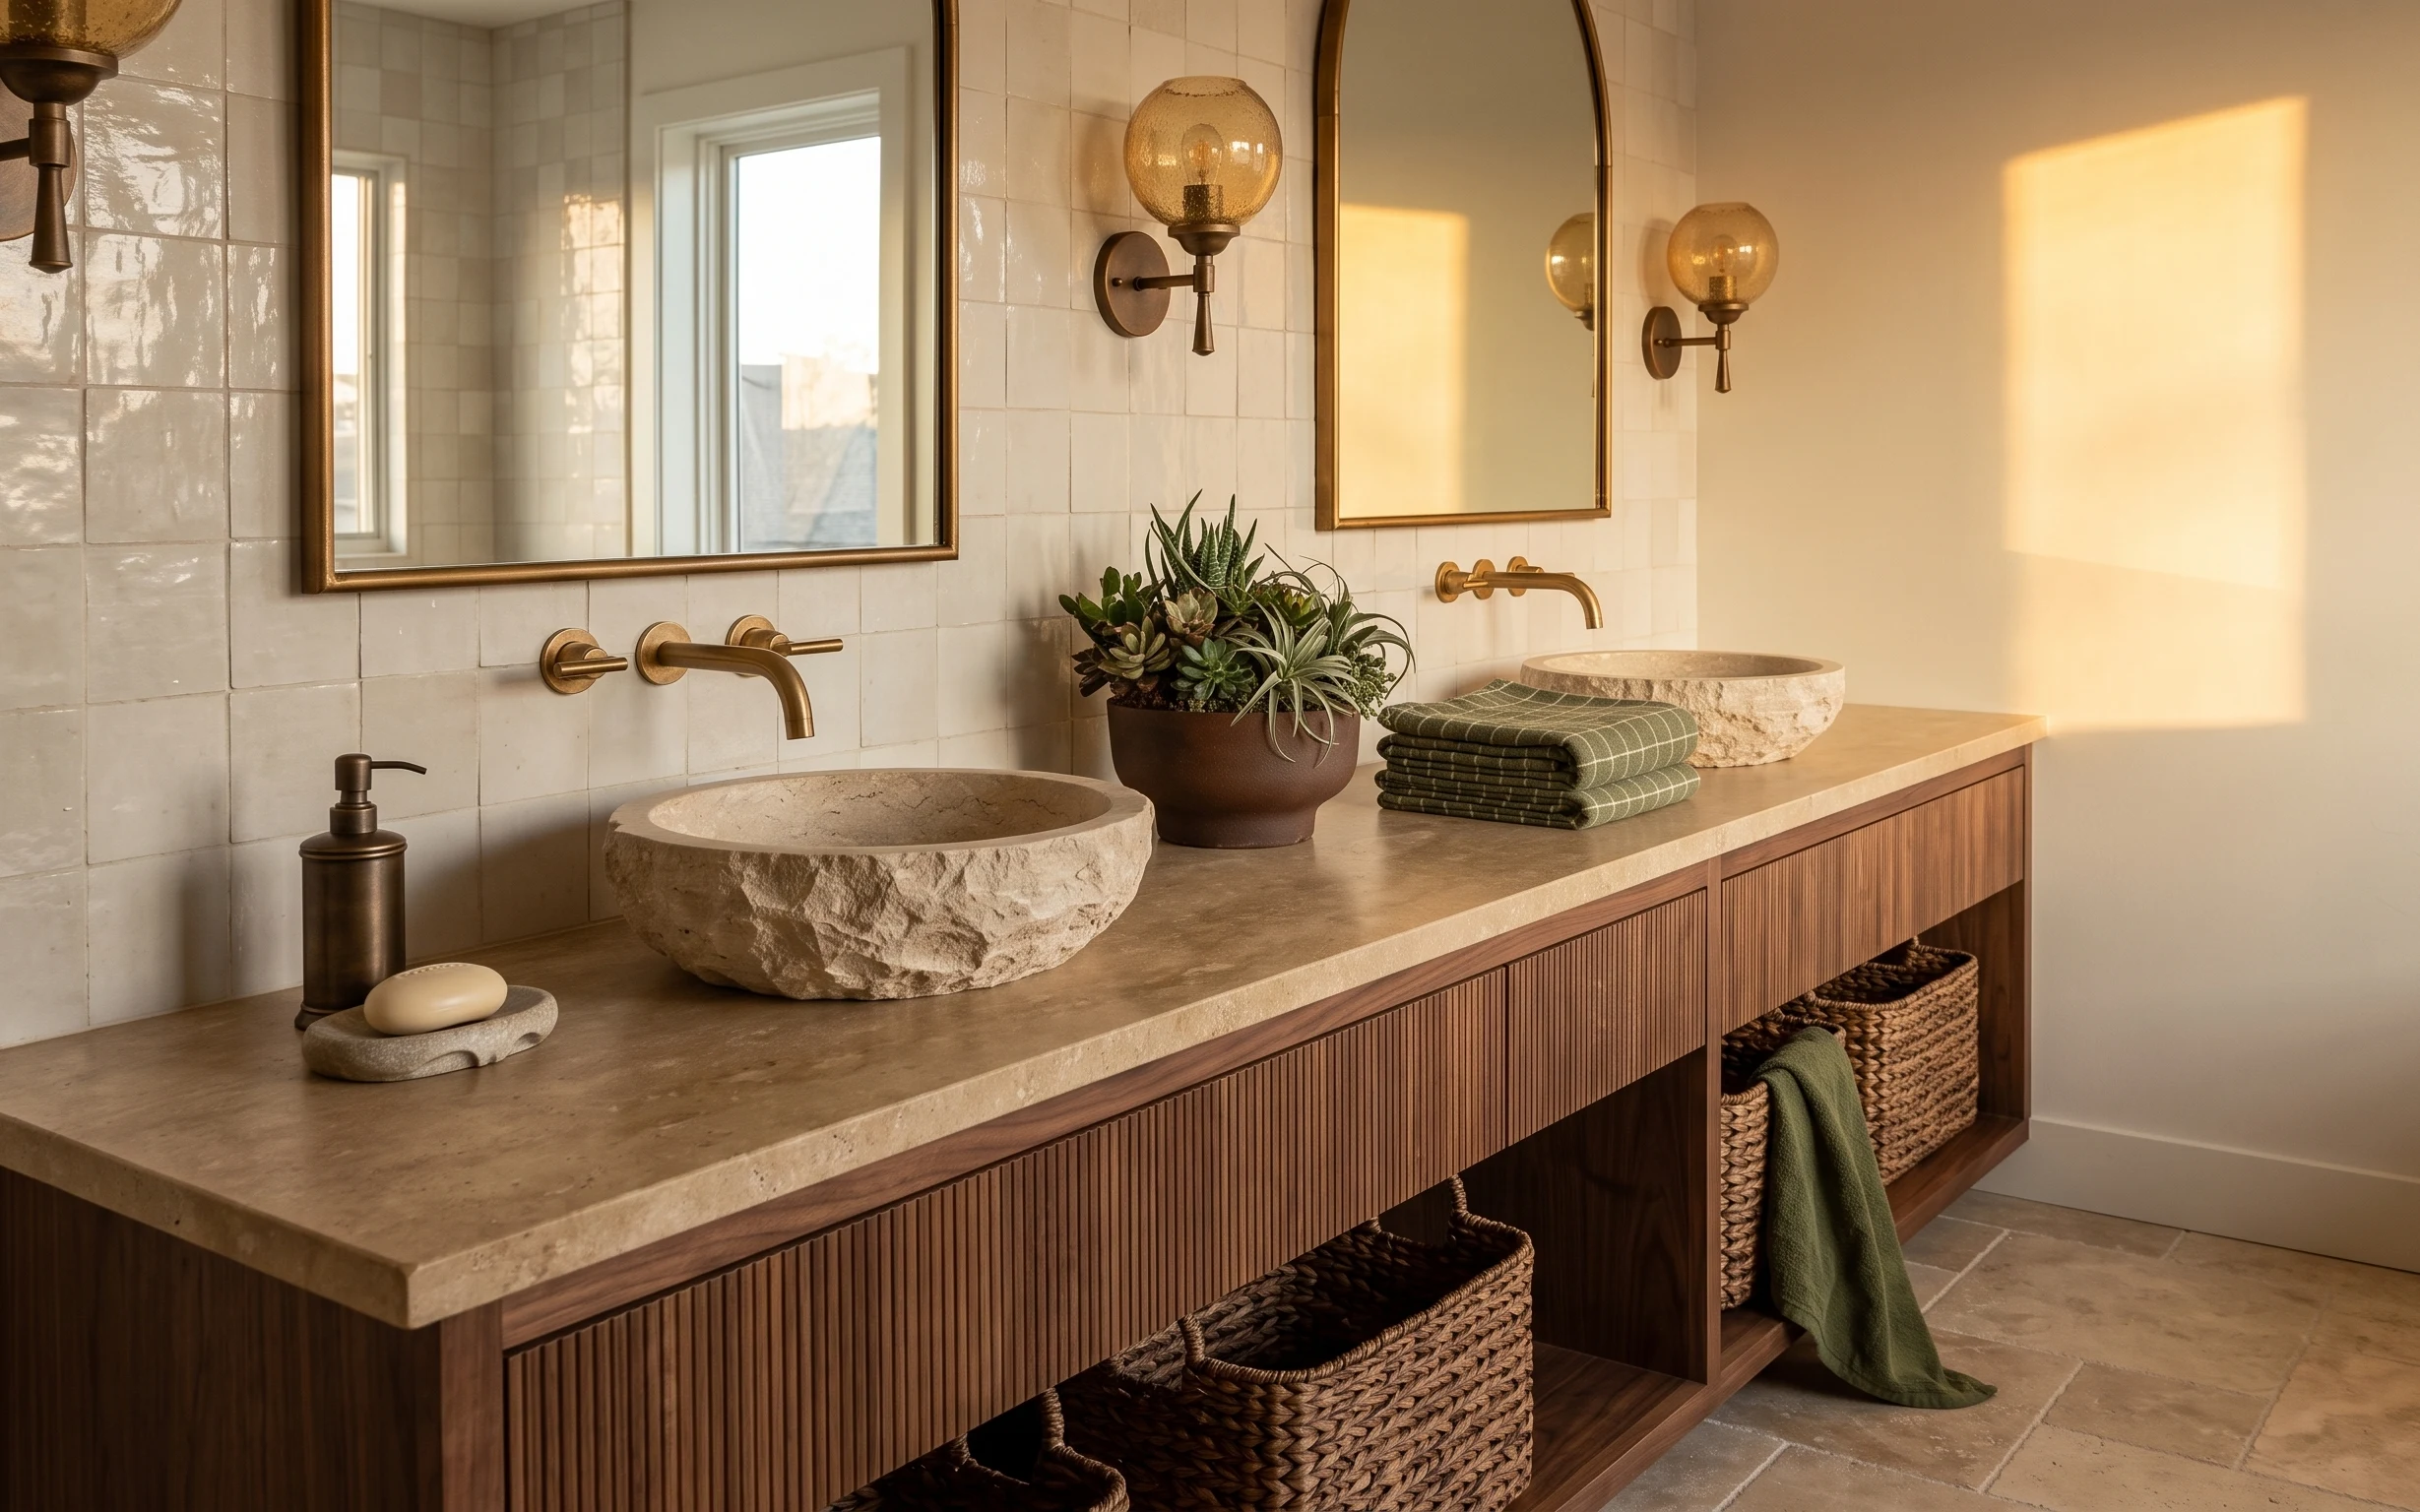
When a bathroom already has classic bones—white wainscoting, a solid vanity, and bright daylight—small upgrades can do the heavy lifting. In this photo, patterned wallpaper adds texture, the framed mirror gives you crisp symmetry, and warm bulbs in the glass-shaded wall sconces soften the cool gray palette. The countertop’s clean lines and the sleek faucet keep everything feeling intentional instead of busy. The best part for homeowners is choosing the highest-impact option first (wall, mirror, lighting), then refining with small accessories.
I used to overthink bathrooms and start with decor—like swapping towels and a tray—before I addressed the wall. It always looked fine for about a day, then the room still felt flat. Here’s what changed my mind: once the wallpaper pattern and mirror shape lock in, the vanity color and hardware details start looking like they were always meant to be together.
Layer 1 — patterned wallpaper wall ($150) Bold pattern, framed in white wainscoting
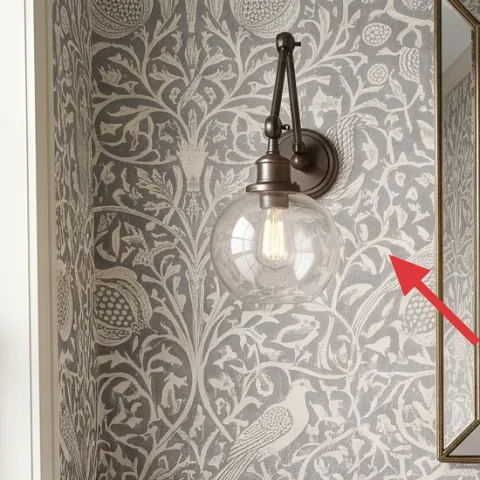
Start with the patterned wallpaper wall behind the vanity. The gray-on-white botanical motif creates depth without adding clutter, and the repeating pattern makes the whole wall feel “finished” even when you keep the counter pretty minimal. The trade-off is that wallpaper isn’t a tiny accessory swap—you’re committing to a specific look—so choose a design that you can live with for a few years. If you’re aiming for a similar vibe, pick a removable option that’s still dense enough to read crisp, not thin. This is the layer that most strongly changes the room’s mood the moment you peel the backing.
Match the pattern scale to your vanity size
A medium-scale print looks intentional in a vanity zone; overly tiny florals can disappear, while oversized motifs can crowd a narrow room.
Layer 2 — framed mirror ($120) Gold trim that makes the gray feel warmer
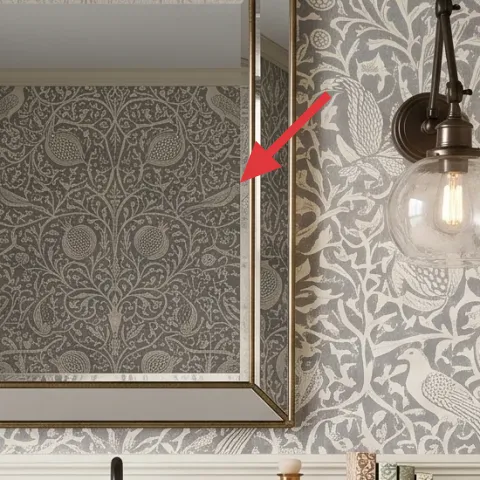
The framed mirror is the visual anchor that balances the wallpaper’s movement. That warm metallic frame pulls the eye upward and pairs naturally with the vanity hardware and glass shades on the sconces, so the room reads cohesive instead of random. The trade-off is straightforward: a mirror frame adds weight and cost compared with an unframed option, and it can be harder to swap later. For a weekend refresh, keep the mirror’s shape simple—rectangular with beveled edges reads classic and works with both modern faucets and traditional hardware. Centering it over the sink also matters more than you’d think for perceived order.
Use the mirror to set your height “rules”
If you’re adjusting positioning, base it on where people naturally look: a centered line across the vanity makes daily use feel easier.
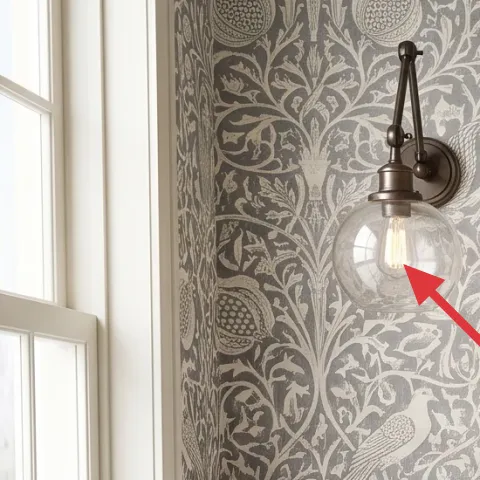
Layer 3 — wall sconce with glass shade ($100) Warm light in two matching spots
In this nook, the wall sconce with a glass shade does two jobs: it adds light and it reinforces the symmetry around the mirror. Even with daylight, the warm bulbs help the gray wallpaper feel softer at night, and the glass globe shape keeps the lighting from looking too harsh. The trade-off here is that you can’t fake the effect—cheap fixtures can look plasticky next to a real metal finish. If you’re swapping fixtures, keep the metal tone consistent with the mirror frame and faucet so the room feels designed, not “picked.”
Don’t mix metal tones randomly
Pick one primary metal finish (brass in this look). Small mismatches are noticeable near a mirror.
Layer 4 — bathroom faucet ($80) Crisp lines that match the vanity scale
Upgrading the bathroom faucet is a fast way to make the vanity feel newer without touching the cabinet. The faucet’s clean silhouette complements the framed mirror’s geometry and keeps the countertop from looking cluttered. It also affects how the whole room reads in photos—reflections in metal and glass grab attention immediately. The trade-off: faucet installs can be fiddly, so budget time for careful alignment and water-tight connections. If a full hardware swap is too much, even just switching the finish (to match the sconces and mirror trim) can give you most of the visual gain.
Keep the finish consistent across 3 points
Anchor your palette with the faucet, mirror frame, and sconce hardware so the gray backdrop doesn’t feel icy.
Layer 5 — bathroom vanity cabinet ($250) Paint for a deeper, richer gray
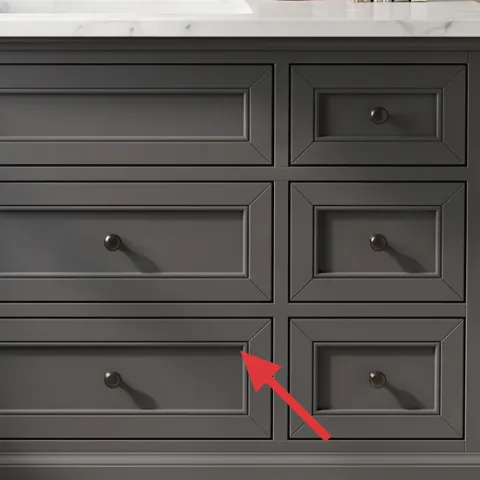
Painting the bathroom vanity cabinet is the biggest “weekend before-and-after” in this setup because it changes the largest surface in the room. A deeper gray like the one shown creates contrast against the white countertop and white wainscoting, while still harmonizing with the patterned wallpaper. The trade-off is time: prep and drying are the real project, not the brushwork. You’re also committing to good coverage so drawer fronts look smooth, not patchy. Done right, the cabinet paint job makes every smaller detail—mirror frame, sconces, and accessories—look intentional instead of mismatched.
Make it instead of buying it
DIY the vanity cabinet paint job so the whole nook shifts from flat gray to a richer, more intentional tone.
Materials
- Degreaser cleaner — 1 bottle — hardware/home center — $25
- Primer for glossy surfaces — 1 quart — hardware/home center — $60
- Cabinet paint (semi-gloss or satin) — 1 quart — hardware/home center — $18
- Sanding pads (180/220 grit) — pack — hardware/home center — $10
- Disposable foam rollers + brush set — 1 set — hardware/home center — $8
Steps
- Clean the vanity thoroughly with degreaser, including drawer fronts and around the faucet area.
- Lightly sand all painted surfaces to dull the finish without gouging the wood.
- Wipe off sanding dust with a damp cloth, then let the surface dry completely.
- Apply primer in smooth, even coats using a foam roller for flat areas and a brush for corners.
- Let primer cure fully per the label, then do a quick spot-sand for any raised texture.
- Apply the first coat of cabinet paint, keeping the strokes direction consistent across each panel.
- Let the first coat dry, then apply a second coat for full, even coverage.
- After the final coat dries to the label’s recommended handling time, reinstall hardware and drawers.
Total DIY cost: $121 — saves about $129 over buying.
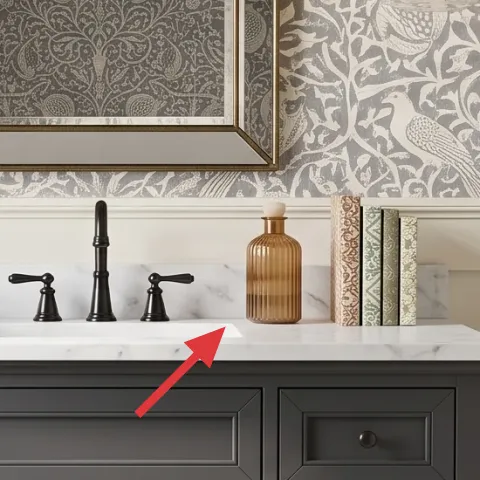
Layer 6 — amber glass soap dispenser ($25) Bring in one warm, see-through moment
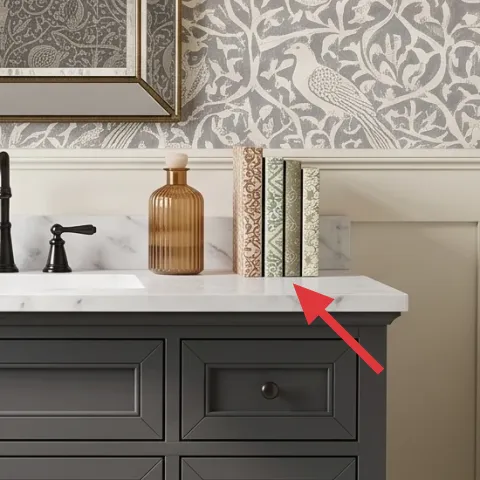
The amber glass soap dispenser on the counter adds a small burst of warmth that keeps the gray palette from feeling cold. Because it’s translucent, it reflects the light from the wall sconces and makes the countertop feel styled rather than sterile. The trade-off is that accessories like this can look “extra” if there’s no plan—so keep the rest of the counter restrained and let one glass item do the color work. This is also one of the easiest swaps for a weekend refresh since you can swap the exact brand or shape without changing anything about your plumbing. Aim for glass with a similar depth of amber, not bright orange.
Use amber sparingly
One warm glass piece is enough; too many warm-toned objects will compete with the wallpaper pattern.
Layer 7 — hanging hand towel ($40) A crisp texture that frames daily use
A hanging hand towel is a small detail, but it changes how “lived-in” the bathroom looks—especially when the wall is busy with patterned wallpaper. In this nook, the towel’s light color reads clean against the white wainscoting and keeps the vanity zone from feeling like a showroom. The trade-off is that towels don’t look good when they’re too thick or too novelty—your goal is absorbent, simple texture that stays neatly draped. If you’re rebuilding the look from scratch, choose a fabric that holds a flat fold (waffle or linen blend) and keep the color close to the mirror/wainscoting whites.
Fold for height, not volume
A simple fold that reaches mid-towel bar keeps the balance with the mirror and sconces.
The cost, layer by layer
| Layer | Item | Cost |
|---|---|---|
| 1 | Peel-and-stick wallpaper (one wall, ~30 sq ft) | $150 |
| 2 | Framed mirror (rectangular, ~24–36 inch) | $120 |
| 3 | Wall sconce with glass shade (hardwired-ready) | $100 |
| 4 | Bathroom faucet (widespread style) | $80 |
| 5 | Bathroom vanity cabinet repaint (DIY or pro-equivalent) | $250 |
| 6 | Amber glass soap dispenser | $25 |
| 7 | Hanging hand towel (light neutral) | $40 |
| Total | $765 | |
If you want the cheaper version, start with peel-and-stick wallpaper on just the vanity wall, use your existing faucet, and swap only the framed mirror and sconces. Skip the cabinet repaint if you’re not ready to prep—clean and paint just the hardware knobs for a smaller upgrade.
What worked, what didn't (across the whole room)
This setup works because it layers “classic” elements—patterned wallpaper, framed mirror, and coordinated metals—so the room looks intentional from every angle. The warm lighting and deeper cabinet tone also keep the gray palette from reading flat.
What worked
- Patterned wallpaper adds texture behind the vanity without adding clutter to the countertop.
- The framed mirror’s clean rectangle shape pairs well with the faucet and vanity front details.
- Warm-glass wall sconces make the gray look softer after dark.
- A deeper gray vanity cabinet creates contrast with the white countertop and wainscoting.
- Matching hardware tones across the mirror, sconces, and faucet keeps the palette cohesive.
- A single amber glass dispenser adds warmth without competing with the wallpaper.
What didn't
- Too many countertop accessories would fight the wallpaper pattern, making the nook feel busy.
- Switching one metal finish without updating the others can look “random” next to the mirror.
- Skipping prep before painting the vanity cabinet can lead to uneven coverage on drawer fronts.
- A towel that’s too bulky can throw off the visual balance around the mirror and sconces.
What we'd skip if we did it again
Skip repainting the vanity if the only goal is color matching. In a wallpaper-and-mirror bathroom, the framed mirror, sconces, and countertop accessories create enough contrast that a lighter cabinet can still look cohesive—especially if the faucet finish is updated.
Skip buying a “matching set” of sconces and mirror without checking metal tone. It’s common for boxed sets to use slightly different undertones, and near a mirror that difference becomes obvious. Instead, buy the mirror and sconces first, then choose one finish family.
Skip extra countertop decor when you’re using patterned wallpaper. The botanical repeat already supplies visual interest, so one amber glass dispenser and a simple tray are plenty to keep the nook styled for everyday use.
Frequently asked
How long does this bathroom vanity nook refresh take?
Wallpaper and mirror placement can usually be done in a single day, and lighting swaps are a short afternoon if you’re keeping the same wiring plan. The slow part is the vanity cabinet paint: drying and reassembly typically take an extra day for safe handling. Overall, most homeowners can get the “after” look by the end of the weekend, but plan around cure times for paint and primer.
Can renters get this look without changing fixtures?
Yes. Use peel-and-stick wallpaper on the vanity wall, keep your existing mirror if it’s not practical to replace, and focus on textiles (a towel and tray) plus a temporary decor upgrade. For lighting, swapping bulbs (not fixtures) is the simplest renter-safe move. If a sconce swap isn’t allowed, the wallpaper + mirror combo still makes the vanity zone feel designed.
What if my bathroom is smaller or the vanity is narrower?
Choose a wallpaper pattern with a medium scale so it doesn’t overwhelm the wall. For a narrow vanity, a simpler rectangular mirror shape keeps proportions calm. Stick to one warm-toned accessory (like the amber dispenser) instead of multiple items. When in doubt, reduce the number of visible countertop pieces so the wallpaper and mirror stay the main focus.
Where should I shop for these exact-style upgrades?
For the quickest weekend wins, look for peel-and-stick wallpaper options that specify one-wall coverage, and framed mirrors with a classic rectangle profile. Wall sconces that use glass shades and similar metal tones are easiest to source from home stores and lighting boutiques. Hardware finishes are often easier to match if you buy the faucet and sconces together or at least choose one metal family first.
What’s the biggest mistake people make in this style of bathroom refresh?
The most common miss is mixing metal finishes without a plan. When wallpaper and a framed mirror are both “busy,” hardware tone mismatch becomes more noticeable. The second biggest mistake is skipping prep before painting the vanity—drawer fronts show brush marks and uneven coverage faster than flat walls. Good prep keeps the cabinet looking smooth and intentional.
More in Bathroom
Under $1000: 7 weekend upgrades for a bathroom vanity nook
A gray wallpaper-and-mirror bathroom vanity nook can feel custom without a full renovation. This 7-layer weekend refresh targets the vanity…
Under $300: brass-and-olive bathroom vanity nook refresh
A brass-and-olive bathroom vanity nook refresh you can do as a renter, using 7 visible swaps around the countertop and floor. The look lean…
Under $400: move-ready beige bathroom corner refresh
A warm beige-and-terracotta bathroom corner refresh that packs up for your next lease. This $400 plan swaps small textiles and decor—plus o…