
- Best for
- a weekend entry refresh that looks finished
- Cost
- about $665 for 7 layers
- Difficulty
- Moderate (with one paint DIY)
- Time
- 1–2 weekends depending on drying/cure
Why walnut-and-cream details are the entry hallway of 2026
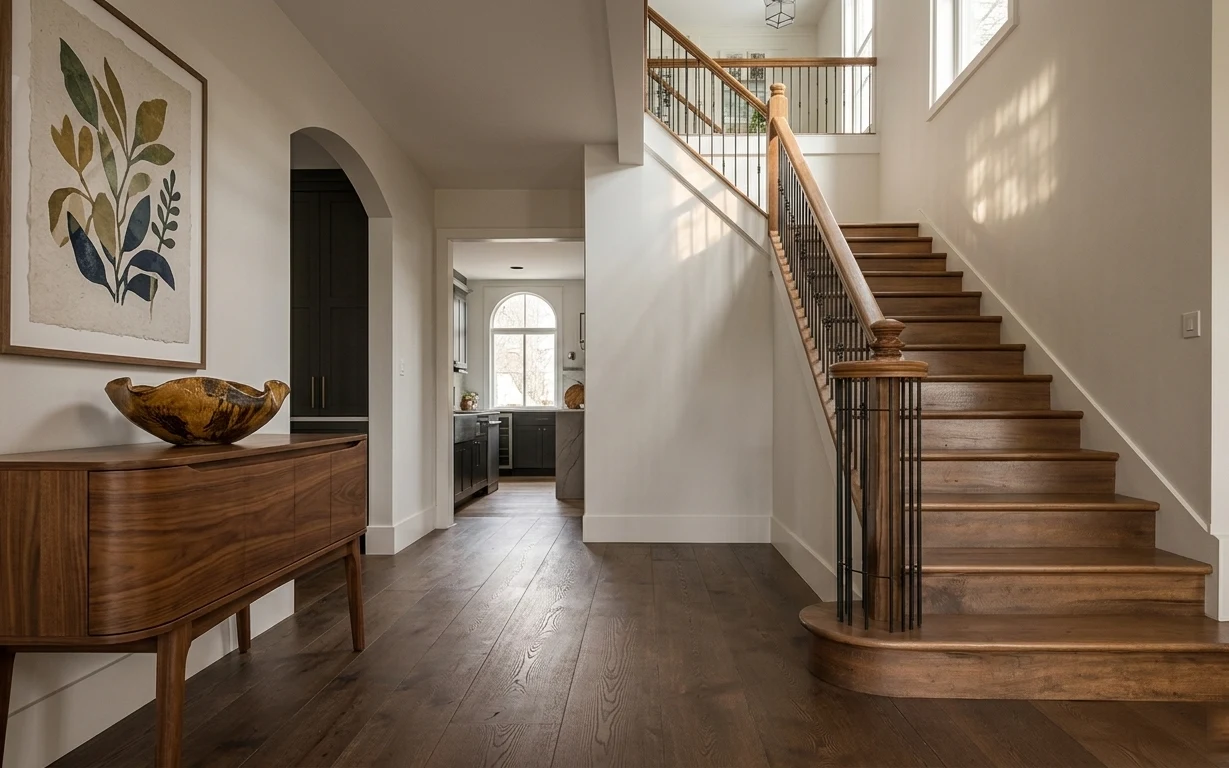
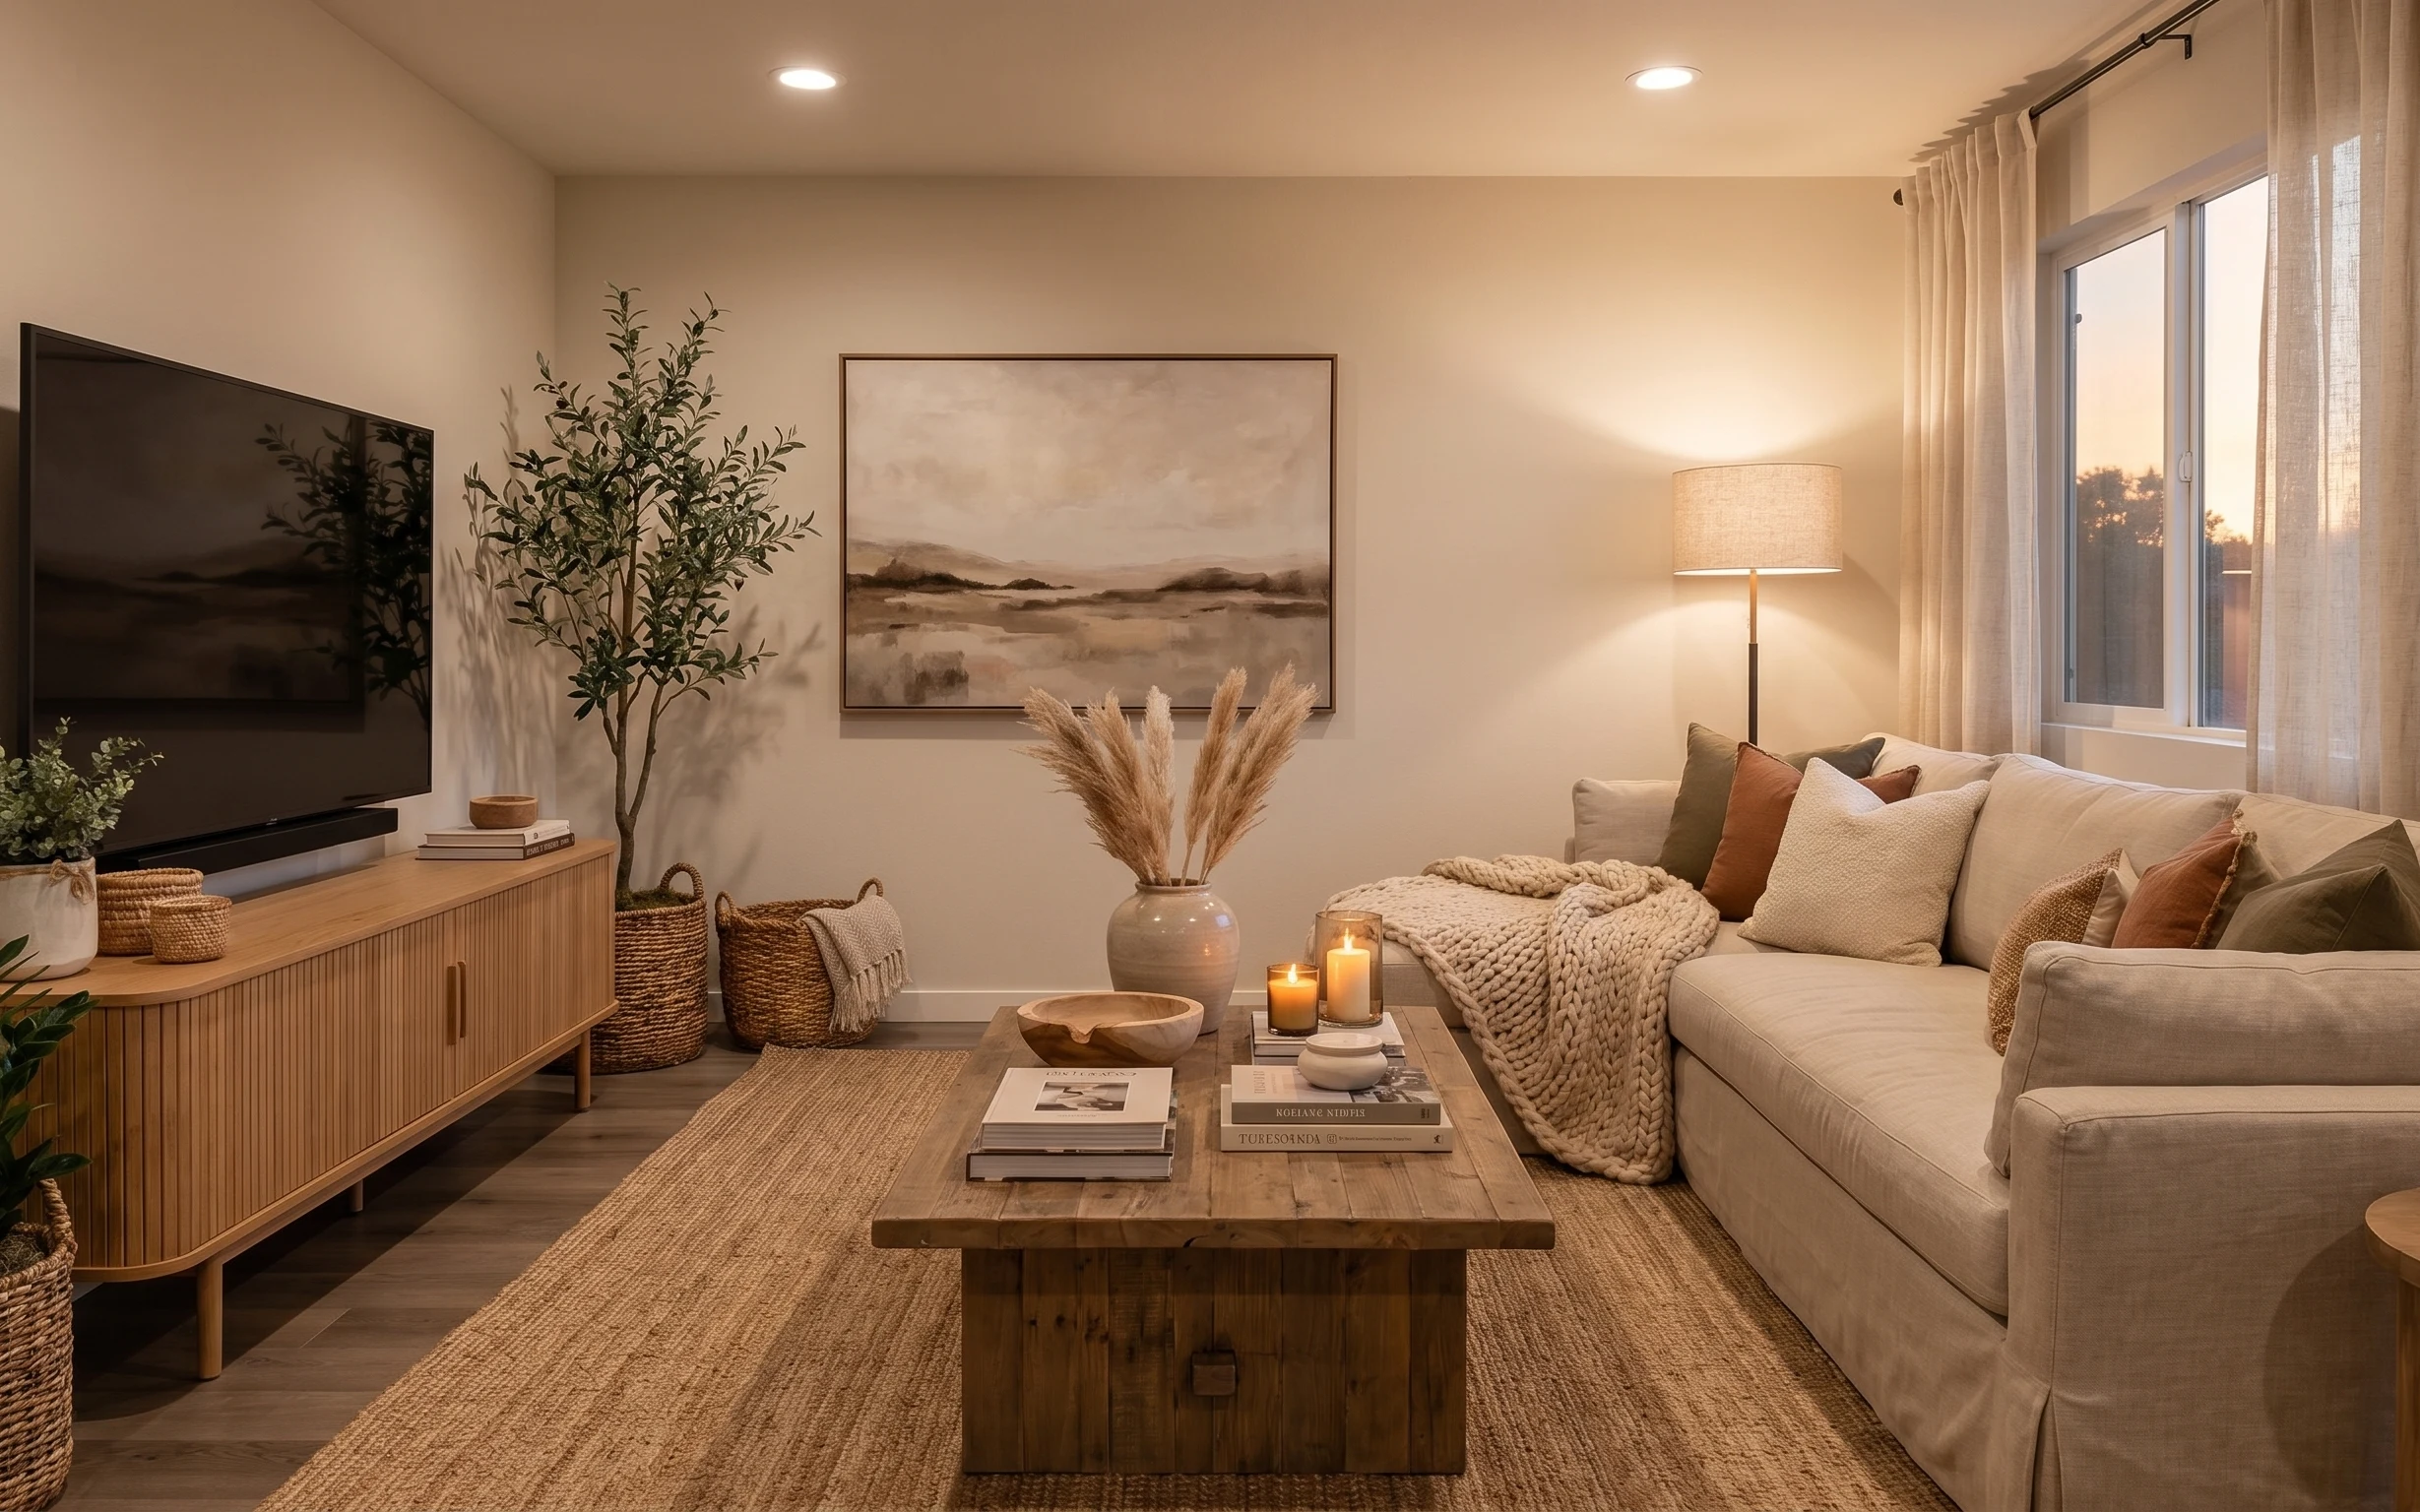
In this bright entry hallway, the warm walnut console and the dark wood floor do the heavy lifting, while the white walls keep everything feeling open. The framed botanical print adds a specific, gallery-like moment, and the wood staircase brings strong vertical lines that you can lean into. My favorite part is the mix of textures: smooth wood grain, paper art, and the softly matte paint. The good news for homeowners is you can choose higher-impact changes—like paint and a new fixture—because you’re improving your own house, not borrowing time on someone else’s timeline.
My biggest “learned it the hard way” moment: I used to buy decorative pieces first and then realize the walls couldn’t handle the contrast. Here, the cream-white walls are doing that calm background job, so you can safely sharpen the focal points instead—art, light, and the console finish. I also used to overthink staircase updates, but a simple tread refresh (not a full rebuild) changes how the whole entry reads.
Layer 1 — framed botanical print ($80) A big print gives the hallway one clear focal point
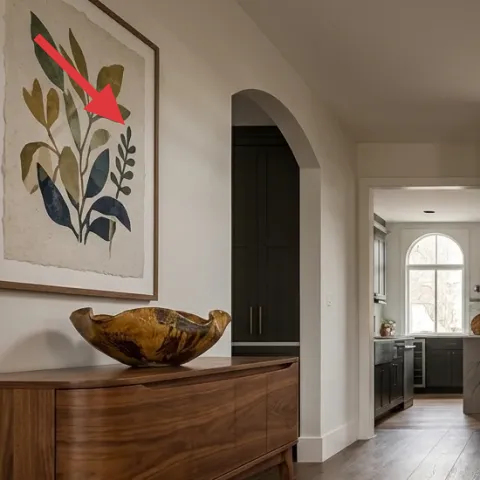
The framed botanical print on the left wall is scaled like real art, not like “something that fits.” That matters in an entry hallway because your eyes land there while you’re still standing in motion. If you go for a similar size, you’ll get the same calm, nature-driven pattern without competing with the staircase. The obvious alternative would be smaller prints or a cluster, but the single larger piece keeps the entry from feeling busy. Trade-off: you’ll need to measure wall placement carefully so it feels centered next to the console table, not floating.
Match the frame thickness to the wood tones
Look for a warm wood or a slim neutral frame so it echoes the walnut console instead of fighting it.
Layer 2 — wood console table ($200) Paint it so the entry feels intentional, not accidental
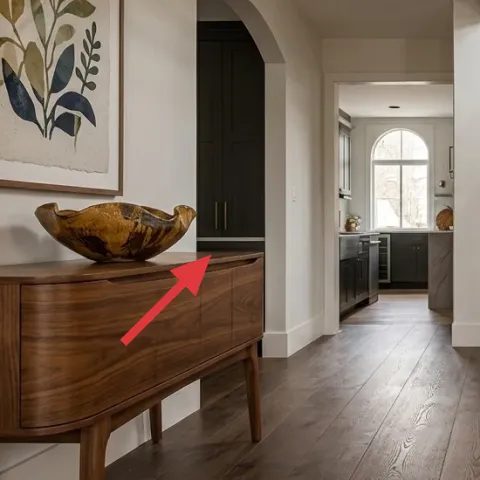
This wood console table sits in direct sight when you walk in, so its finish sets the mood faster than you’d expect. In the photo, you can see the grain and the warm brown tone; painting it (with a finish designed for furniture) lets you lighten the look or add contrast without replacing anything. The trade-off is time: prep is non-negotiable, because console tops get touched and bumped. The higher-impact alternative—buying a whole new console—costs more and often misses the scale you already have. A DIY refresh also keeps the space cohesive with the framed botanical print and the staircase wood.
Make it instead of buying it
DIY the console table finish by painting the base and adding a furniture-safe clear topcoat so it looks upgraded while keeping the same table scale.
Materials
- Furniture primer, 1 quart (or 1 can) — any store — $35
- Interior cabinet & trim paint, 1 quart — any store — $18
- Foam roller + angled brush set — any store — $12
- 120–220 grit sandpaper + sanding block — any store — $10
- Microfiber tack cloth + painter’s tape — any store — $5
Steps
- Wash and degrease the console surface so paint sticks to the existing wood.
- Lightly sand the top and base to scuff-smooth the finish.
- Wipe down with a tack cloth to remove dust.
- Prime all painted areas, keeping edges crisp where the top meets the base.
- Let the primer cure fully, then sand lightly for a smooth next coat.
- Roll and brush on paint in thin layers for even coverage.
- Let paint dry, then check for any rough spots and touch them up.
- Apply a clear, furniture-safe topcoat to protect the finish from daily use.
- Allow the topcoat to cure before putting décor back on the console.
- Remove tape carefully and inspect corners for any cleanup needed.
Total DIY cost: $80 — saves about $120 over buying.
Layer 3 — wooden decorative bowl ($25) The bowl adds warmth between “art” and “stairs”
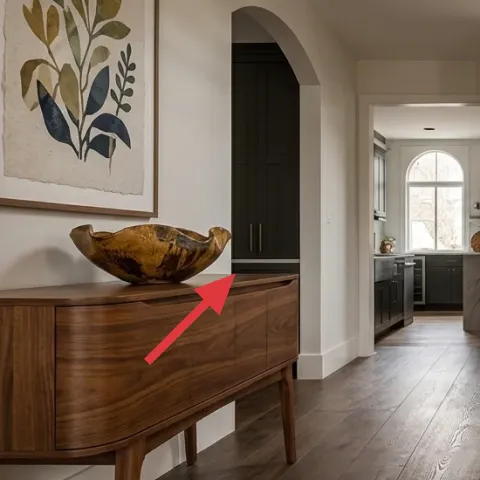
The wooden decorative bowl on the console reads like a texture bridge: it sits between the flat plane of the wall art and the vertical lines of the staircase. Because it’s relatively sculptural, it also stops the console from looking like an empty surface. If you’ve ever styled an entry and felt like it looked good for two hours, that’s usually why—small objects need a repeatable visual anchor. The trade-off with going smaller is that the bowl can disappear at hallway viewing distance. Buying a medium, warm-toned bowl is cheaper than replacing the console, and it’s easy to swap seasonally.
Keep the bowl tone close to the stair treads
In this photo, the staircase wood is similar in warmth, so matching undertones makes the whole entry feel edited.
Layer 4 — ceiling light fixture ($120) Better overhead light makes the art and wood read warmer
The ceiling light fixture is partly visible near the top of the frame, but it still influences how everything feels after dark. Upgrading the fixture to one with a cleaner profile (and a warm bulb temperature) helps the framed botanical print look less flat and the wood floor look richer. The obvious alternative—adding a plug-in lamp—works too, but the hallway has sightlines that make overhead light the most efficient. Trade-off: fixture swaps require basic comfort with turning off power and installing mounting hardware safely. If you don’t feel confident, a licensed electrician for the wiring is worth it, because an entry light is not where you want a loose connection.
Don’t pick a cool-white bulb for walnut wood
Cool light can make warm browns look dull, and it fights the cream wall palette you’re trying to keep.
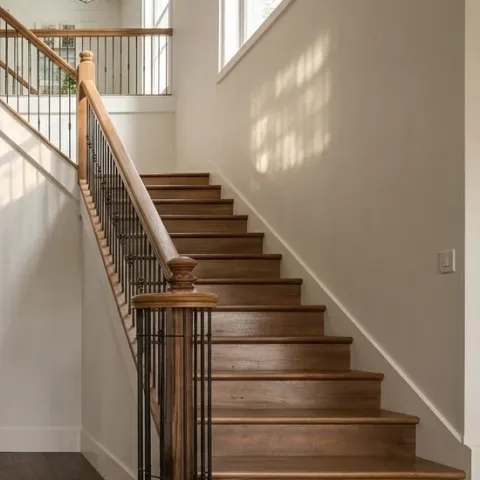
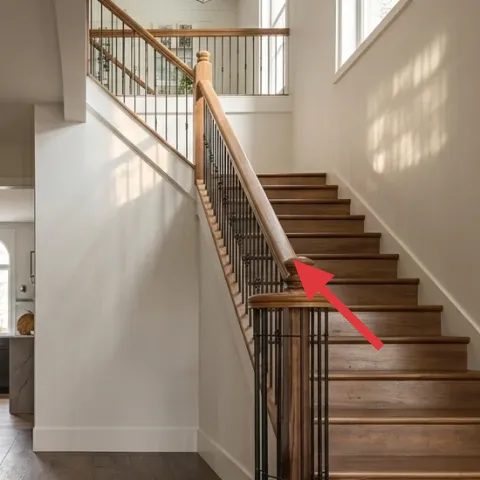
Layer 5 — wood stair treads ($70) A tread refresh tightens the whole entry’s “finished” look
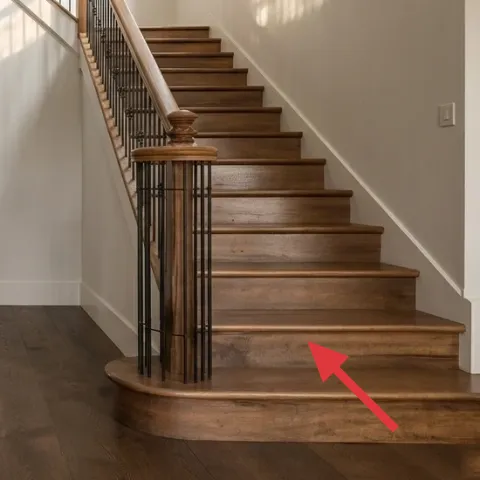
The wood stair treads pull the eye up and to the right, so any dullness or uneven wear reads immediately in an entry hallway. A weekend tread refresh—cleaning, scuff-sanding, then applying a wood-finish topcoat—can even out the sheen and make the staircase feel cared-for instead of “wait for later.” The trade-off is planning around foot traffic, since steps need time to dry and cure before you rely on them. Buying new stair materials isn’t a weekend project, but refreshing what’s already there gives a surprisingly similar visual impact. Keeping the tone warm also makes the console table feel like it belongs in the same design system.
Test finish sheen on a hidden tread edge
Sheen levels vary by product, so a small test helps avoid a too-glossy landing look.
Layer 6 — white painted walls ($70) Bright walls keep the hallway airy while letting wood feel richer
The white painted walls are the quiet background that makes the botanical print and walnut console pop. If you’re noticing scuffs, uneven touch-ups, or a slightly gray cast, repainting one clean, consistent color can make the entire entry read more cohesive. The alternative—spot painting only damaged areas—usually leaves patchy sheen differences, especially in daylight like this. Trade-off: you need painter’s tape and clean edges around trim and the doorway, but you don’t need to redo anything structural. A homeowner-only paint refresh is one of the fastest ways to make a space feel newer without buying more furniture.
Blend sheen, not just color
Match the wall finish type so the new paint doesn’t look shinier than the existing walls.
Layer 7 — dark wood floor ($100) A focused floor clean-polish makes “rich” look intentional
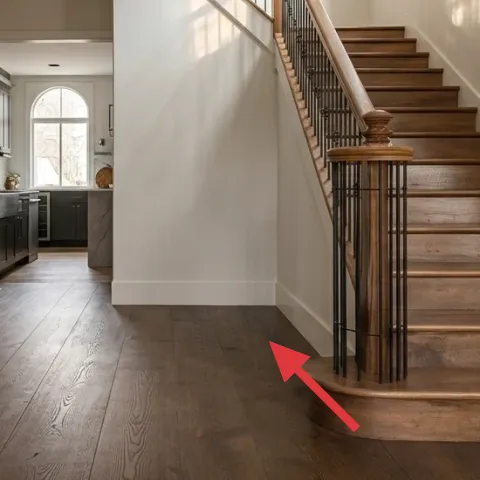
The dark wood floor is the foundation color for this entry hallway, and it’s visible the second you step inside. When floors look slightly dry or cloudy, even great décor can feel dated. A focused clean-and-polish routine (with a product made for sealed wood floors) can improve clarity and reduce the “dusty” look in natural light. The obvious alternative—bigger renovation options—are off-limits for a weekend. The trade-off here is that you’re working with what’s already on the floor, so the results depend on how well it’s been maintained. Still, polishing is a cheaper way to make the whole entry feel refreshed.
Use microfiber pads, not abrasive scrubbers
Gentle pads protect finish clarity and help you avoid streaking.
The cost, layer by layer
| Layer | Item | Cost |
|---|---|---|
| 1 | Framed botanical print (replacement) | $80 |
| 2 | Wood console table (DIY finish equivalent) | $200 |
| 3 | Wooden decorative bowl (medium) | $25 |
| 4 | Ceiling light fixture (updated flush-style) | $120 |
| 5 | Wood stair tread topcoat refresh | $70 |
| 6 | Paint, 1 gallon (white wall touch-up/coat) | $70 |
| 7 | Wood floor cleaner + polish kit (sealed floor) | $100 |
| Total | $665 | |
If you want a cheaper variant, focus on the print, the console paint DIY, and one “finish fix” (either the stair tread refresh or a paint coat). Skipping the floor-polish kit and keeping the existing overhead light helps keep the total under a tighter ceiling.
What worked, what didn't (across the whole room)
This entry hallway works because the warm wood tones already feel consistent, and the framed botanical print gives the space a clear focal moment. The biggest wins came from tightening finishes—paint, treads, and light—so the whole area reads “done,” not pieced together.
What worked
- The large framed botanical print creates an instant focal point before you even reach the stairs.
- Refreshing the console finish makes the wood look intentional against the white painted walls.
- The wooden decorative bowl adds texture without adding clutter to the narrow entry zone.
- Upgrading the ceiling light fixture keeps the art readable after dark instead of looking flat.
- A wood stair tread topcoat evens out wear so the staircase feels cared-for, not neglected.
- Floor cleaning and polish reduces haze in daylight and makes the whole palette look richer.
What didn't
- Spot-painting small scuffs tends to leave visible sheen differences in bright daylight.
- Choosing a cool bulb for overhead light made the walnut tones look slightly dull.
- Overstyling the console with multiple small objects distracted from the framed print.
- Skipping the prep step on the console paint led to uneven coverage at edges and corners.
What we'd skip if we did it again
Skip multiple small wall pieces on the left wall. In an entry hallway with strong vertical movement from the staircase, a single larger framed botanical print reads cleaner and feels more gallery-like.
Skip a “weeknight” console refresh without sanding and primer. Furniture paint holds up only when the surface is scuffed and prepped, especially on a console top that gets daily contact.
Skip changing everything at once—especially the floor and stairs and paint in the same weekend. Pick two “finish” projects, then stop while the entry already looks cohesive.
Frequently asked
How long does this kind of entry hallway refresh take?
Most of the time is tied up in cure and dry steps. Painting the console table typically takes a day plus dry time, while paint for walls and any stair tread refresh needs full cure before you put weight or décor back. If you keep the changes focused—print, console finish, one light decision, and one finish update—the visual payoff usually shows within the first weekend.
What if I rent—can I still get the same look?
For renters, swap the DIY console paint plan for removable updates: framed art with sturdy hanging methods, a temporary tabletop styling reset with the wooden decorative bowl, and a lighting upgrade only if your rental allows bulb/fixture changes. A rent-friendly option is swapping wall lighting through a plug-in style where possible and using peel-and-stick wallpaper only on an accent wall if your lease permits it.
My entry hallway is narrower—should I size down the framed botanical print?
If your hallway is narrower, sizing down is usually better than trying to force the same footprint. The key is keeping the print large enough that it anchors the wall visually while still leaving breathing room around the console table. A good rule: the print should sit centered and feel like it belongs to the console, not like it’s just “covering a blank wall.”
Where should I shop to find pieces that match the wood-and-cream palette?
Look for warm-wood finishes and neutral framing in stores that specialize in home décor, not just big-box furniture. Search for a framed botanical print in similar greens and muted blues, and match the frame material to the walnut console table undertone. For the wooden decorative bowl, focus on a natural finish rather than heavy varnish so it won’t look plasticky under the ceiling light fixture.
What’s the biggest mistake people make in entry hallway styling?
The biggest mistake is treating the entry like a living room display. Entries need fewer, larger anchors: one framed botanical print, one console focal object (like the wooden decorative bowl), and lighting that keeps colors readable. If the console becomes crowded, the staircase and art fight for attention, and the hallway ends up feeling busy instead of intentional.
More in Living Room
Under $700: walnut-and-cream entry hallway refresh
A bright, walnut-and-cream entry hallway can feel finished without a big remodel. This $700 weekend refresh uses a bold framed print, a ref…
Under $500: earthy boho living room seating area refresh
A warm, earthy living room seating area refresh using move-ready swaps under $500. Focus: grounding rug, cozy textiles, and candle-and-tray…