- Square footage
- Small corner (under 80 sq. ft.)
- Cost
- About $290 total
- Difficulty
- Confident DIY
- Renter-safe
- No—paint is permanent
Why warm-neutral palette is the built-in storage nook of 2026
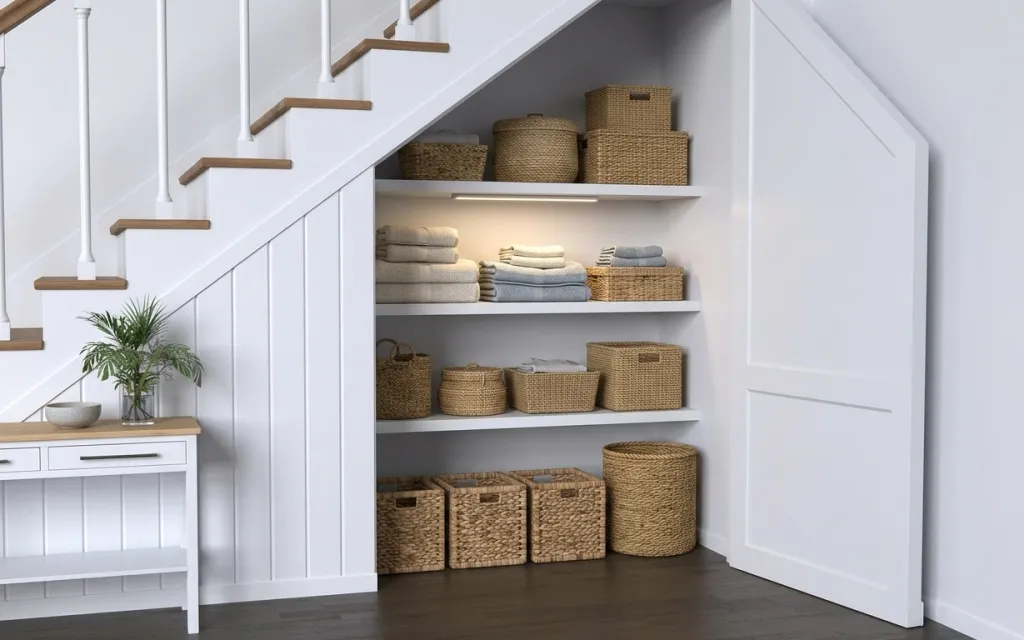
That bright white shiplap backdrop makes every natural texture—woven baskets, folded throws, and the clean lines of the cabinet—look sharper. The space also has a warm linear LED strip under the top shelf, so your “storage” reads like styling, not clutter. On the left, the palm plant in a white ceramic pot brings life to the corner, while the dark wood floor keeps the neutrals from going flat. This refresh is very achievable on a homeowner weekend because the biggest wins come from paint, lighting, and decor edits, not major construction.
I used to overthink these built-in moments and start by rearranging everything at once. On my own shelves, that turned into a messy middle—no clear hierarchy between baskets and textiles. This time I’d pick a repeatable pattern: one greenery, one ceramic shape, one stack of throws, and baskets in two sizes. Once that system clicks, the LED glow does the rest of the “why does this look styled?” work.
Layer 1 — indoor palm plant in a white ceramic pot ($45) Soft green height against the white shelves
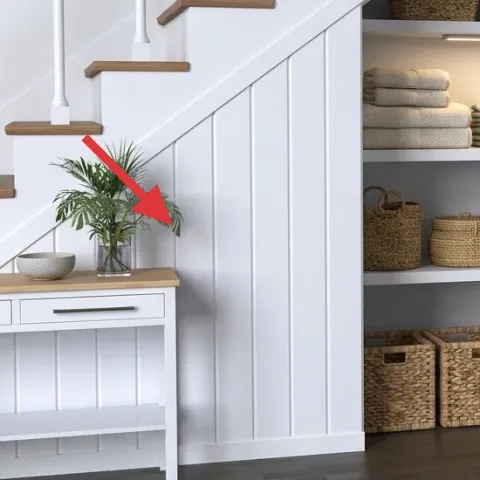
A palm plant in a white ceramic pot gives you that subtle “coastal farmhouse” note without adding color you’ll regret later. In this photo, the plant sits low and slightly forward on the cabinet ledge, so you get height and movement without blocking the shelves. The trade-off is upkeep: plants need a real light source and occasional dusting, but it’s easier than trying to match a complicated pattern with paint. Compared with adding another decorative object, the living texture helps the whole nook feel less staged and more lived-in.
Add the plant before you finalize baskets
Putting the greenery in first helps you judge scale, so your baskets don’t end up looking too short (or too tall) next to it.
Layer 2 — white ceramic bowl on the cabinet top ($20) A smooth counterpoint to woven texture

The white ceramic bowl on the cabinet top is small, but it’s doing a lot: it repeats the shiplap’s clean white and gives the eye a place to rest between the plant and the shelves. I like this choice over a tray because the bowl reads softer and doesn’t compete with the baskets’ texture. Keep it empty or style it with something simple and flat so it doesn’t turn into “another small clutter pile.” The key is contrast—ceramic smoothness against tight woven patterns—so the nook stays calm.
Keep the bowl color in the same white family
If your paint is warm white, choose a ceramic that doesn’t look blue-gray next to it.
Layer 3 — woven baskets on the shelves (wide set) ($60) Wide storage that reads as decor
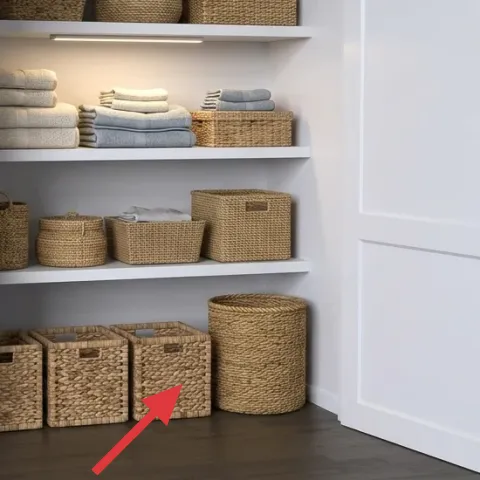
Those wide woven baskets along the lower shelves are what make the storage feel intentional instead of random. They create rhythm—three similar shapes side-by-side—so the nook looks curated even when you’re storing everyday linens. The big decision here is keeping the baskets in the same tone (wheat/tan) so the room stays neutral. I’d choose this over buying bins with printed labels because woven texture is harder to fake with paint and keeps looking good as seasons change. If your shelf openings are larger, a wider basket style also reduces the “gap” problem.
Use baskets as the boundary lines
Let basket edges define where visual “rows” start and stop, instead of trying to tuck items perfectly everywhere.
Layer 4 — tall woven cylinder basket on the floor ($35) A vertical anchor for the corner
A tall woven cylinder basket on the floor gives the nook a strong vertical note that the lower shelves alone can’t provide. In the photo, it sits near the right edge, so it balances the palm plant on the left and makes the corner feel symmetrical even without a full wall mirror. This is the trade-off: cylinder baskets take more floor space, so measure first and pick one that’s tall but not so bulky it crowds the doorway. Compared with a floor vase, it’s more practical—you can actually store extra throws or spare linens inside.
Don’t pick a basket that’s too light or too fuzzy
Very flimsy fibers shed, and overly pale straw tones can look chalky next to warm white paint.
Layer 5 — stack of folded light gray throws ($30) Crisp texture with a soothing neutral

Stacked folded throws in light gray bring structure to the shelves. They fill space cleanly, and because the folds are directional, they add visual texture without introducing new pattern. I’d keep the stack slightly compressed—like the photo—so it looks intentional rather than tossed. The alternative is using a bunch of smaller decorative objects, but that usually reads messy once you start using the nook for storage. Light gray is also a good balancing color: it contrasts with the wheat baskets while staying close to the warm white background.
Fold to show edges, not lumps
Sharp edges make the stack look styled; loose folds look like storage.
Layer 6 — linear LED strip light under the top shelf ($30) Warm glow that makes shelves feel finished
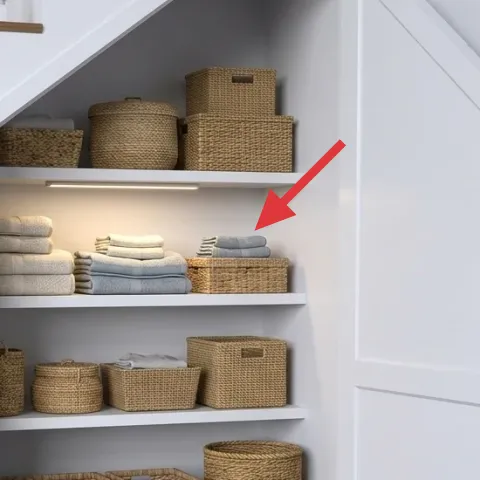
The linear LED strip under the top shelf is the “finished” detail. It creates a warm pool of light across the folded throws, so the nook looks inviting even without overhead lighting. The trade-off is placement: if the strip is mounted too high or too weak, you’ll get shadow lines instead of an even wash. This is still weekend-friendly because you can choose an LED strip kit made for shelving and follow the included mounting method. Compared with swapping a ceiling fixture, shelf lighting is easier to target and it highlights the exact surfaces you’re styling.
Choose a warm-white LED, not daylight
Warm white keeps the shiplap creamy and prevents gray throws from turning blue.
Layer 7 — warm white paint for the shiplap-style wall paneling ($70) The creamy backdrop that stops neutrals from going flat

Painting the shiplap-style wall with a warm white is the foundation move. In the photo, the whites look creamy—not icy—so the light gray throws stay soft and the woven tan baskets keep their natural warmth. If you choose a pure bright white, woven textures can start to look dusty and the whole nook can feel a little clinical. The weekend trade-off is planning: you’ll need time for prep and drying between coats, but the payoff is that every other item (plant, baskets, throws, lighting) looks more cohesive instantly. This is the one change you’ll feel every time you walk past the corner.
Make it instead of buying it
DIY-ing the warm white paint refresh is the biggest visual foundation shift, because it changes how every woven and gray piece reads against the shiplap.
Materials
- Warm white interior paint (1 gallon) — 1 — local home center — $20
- Painter’s tape — 1 roll — hardware store — $15
- Small angled sash brush — 1 — hardware store — $10
- Paint roller cover + tray liners — 1 set — hardware store — $3
- Plastic drop cloths — 1 roll — hardware store — $2
Steps
- Clean the shiplap panels with a damp cloth, then let fully dry.
- Remove or mask edges using painter’s tape along trim and shelf bases.
- Cut in the grooves and edges with the angled sash brush.
- Roll the flat areas in thin coats, keeping a consistent direction on each panel.
- Let the first coat dry completely, then apply a second thin coat if needed.
- Remove tape carefully while paint is slightly tacky, then let cure fully.
Total DIY cost: $50 — saves about $20 over buying.
Test paint on one shiplap section
Drying shifts tone in grooves, so check it in the same evening light your LED strip creates.
The cost, layer by layer
| Layer | Item | Cost |
|---|---|---|
| 1 | Indoor palm plant in white ceramic pot | $45 |
| 2 | White ceramic bowl on cabinet top | $20 |
| 3a | Wide woven baskets (set) | $40 |
| 3b | Extra wide woven basket (to match set) | $20 |
| 4 | Tall woven cylinder basket | $35 |
| 5 | Stacked folded light gray throws | $30 |
| 6 | Linear LED strip light kit | $30 |
| 7 | Warm white paint (1 gallon) for shiplap paneling | $70 |
| Total | $290 | |
If you want a cheaper variant, skip the LED strip and use a single plug-in warm lamp nearby, then put that savings into one larger basket set. You’ll still get the organized look, just with less targeted shelf glow.
What worked, what didn't (across the whole room)
The layout works because warm white shiplap keeps everything bright while woven baskets and stacked throws create texture hierarchy. The palm and ceramic bowl prevent the shelves from feeling like only storage. The lighting detail also matters: the warm shelf glow makes the stacks look like styling, not random piles.
What worked
- Warm white shiplap makes light gray throws look soft instead of bluish.
- Woven baskets define “rows” on the lower shelves so storage reads as design.
- A tall cylinder basket balances the nook’s right side without adding clutter.
- The palm plant adds movement and natural texture at eye level.
- Linear LED shelf lighting highlights the throw stacks and reduces shadowy corners.
- The white ceramic bowl repeats the wall tone and gives smooth contrast.
What didn't
- If the LED is too cool, it can push gray throws toward an unwanted blue cast.
- Baskets that are too pale can look chalky next to warm white paint.
- Over-stuffing the shelf stacks makes them look like storage bins.
- Choosing a plant pot that’s too gray-blue can fight the room’s warm neutrals.
- Skipping a repeat color (like white ceramic) leaves the styling feeling random.
What we'd skip if we did it again
Skip adding lots of small decor objects on the shelves. Between baskets, folded throws, and plants, the nook already has texture; too many extras make it feel busy fast.
Skip using daylight/cool-white bulbs in the shelf lighting. Warm LED is the difference between “soft organized corner” and “office shelf glow,” especially next to light gray textiles.
Skip going for an ultra-bright white paint. A warm white keeps the woven tan fibers looking rich, and it helps the gray throws stay calm rather than stark.
Frequently asked
How long does a refresh like this usually take on a weekend?
Plan for about 4–7 hours for paint (including prep and dry time), plus 1–2 hours for assembling the LED strip kit and styling baskets and throws. If the shelves are already clean and empty, styling is the fastest part—usually under an hour.
What if this is a rental and I can’t paint the shiplap?
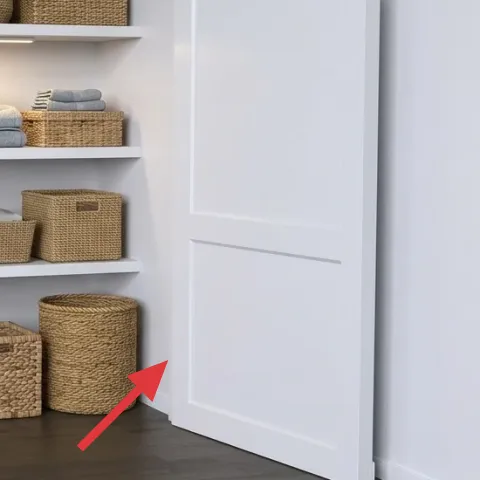
Replace the paint layer with a non-permanent warm backdrop: use removable peel-and-stick wallpaper on the wall panels, or focus only on layers 1–6 (plant, ceramic bowl, baskets, throws, and LED strip). Your lighting choice still matters a lot, because warm light makes neutrals look creamy.
What if my built-in shelf openings are wider or narrower than the photo?
Use basket and textile scale as your guide. Wider openings need baskets that reach the shelf edges (or you’ll see big empty gaps). Narrow openings work better with taller, slimmer baskets and a slightly smaller throw stack so the shelf doesn’t look top-heavy.
Where should I shop for the woven baskets and throws?
For woven baskets, look at home goods stores and online retailers that carry natural fiber storage. For throws, search for “light gray throw blanket” in washable fabrics; you want something that can handle real use because these stacks get touched constantly.
What’s the biggest styling mistake that shows up in these nooks?
The biggest mistake is mixing too many tones at once. When baskets are one tan, throws are one gray, and the ceramic and wall are both in the same white family, the nook looks intentional. If you add extra colors without repeating them, it starts to feel accidental.
Is the LED strip hard to install?
Most shelf LED kits are designed for simple mounting and plug-in power. The main challenge is alignment: take a couple minutes to dry-fit the strip along the underside and check that it lights the throw stacks evenly without shining directly into your eyes.
More in Small Spaces

Under $300: warm-neutral built-in storage nook refresh
This built-in storage nook uses warm neutrals, woven baskets, and soft LED shelf lighting to make a compact corner feel intentional. With a…
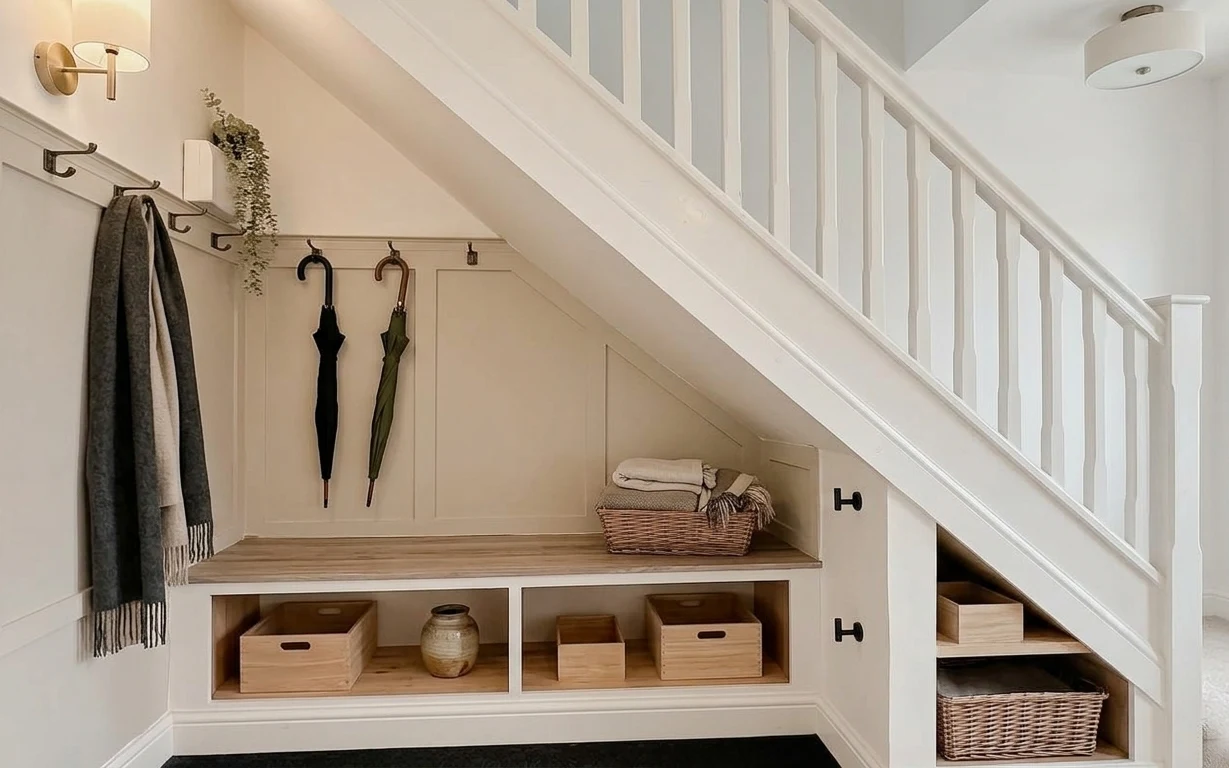
Under $300: under-stair entry nook refresh with renter swaps
A bright under-stair entry nook that feels organized, not cluttered. This renter-friendly refresh uses 7 move-friendly swaps—$260 total at …
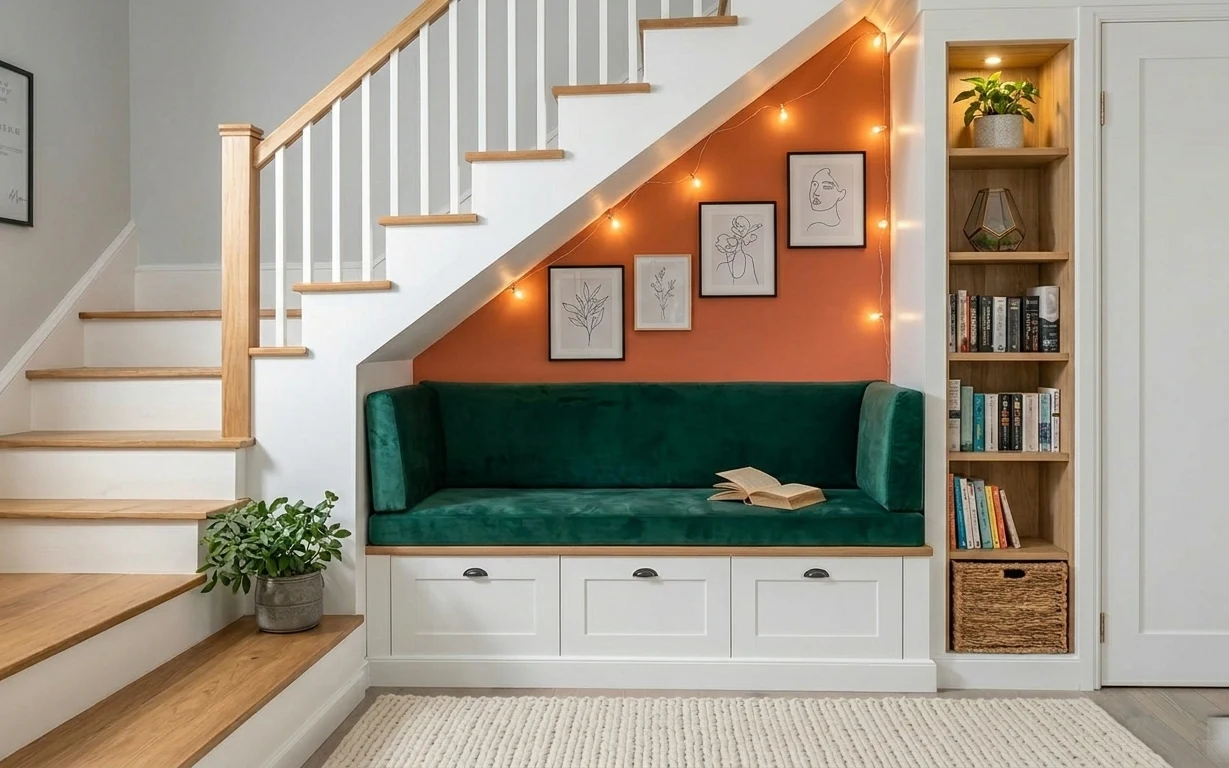
Under $400: built-in bench nook refresh with 7 move-ready swaps
A built-in bench nook already has personality—so this refresh leans on move-ready swaps: a textured cream rug, warm string lights, framed b…