- Best for
- Layered, olive-and-cream rental styling
- Time
- 90 minutes to style, 30 minutes to buy
- Total cost
- $352
- Renter-safe
- All portable swaps (no drilling for this plan)
Why olive-and-cream textures are the bedroom of 2026
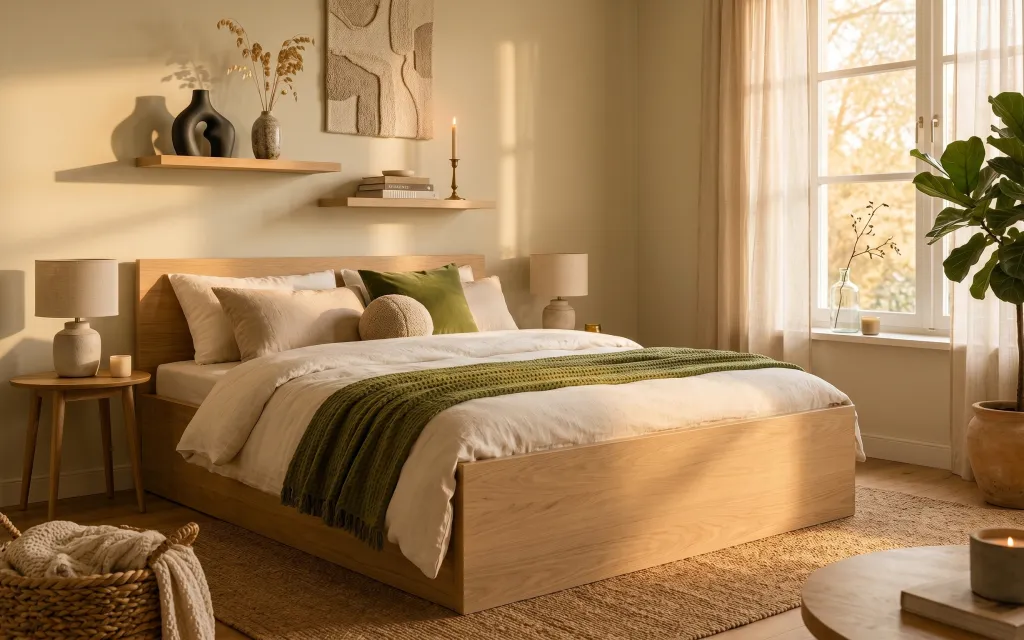
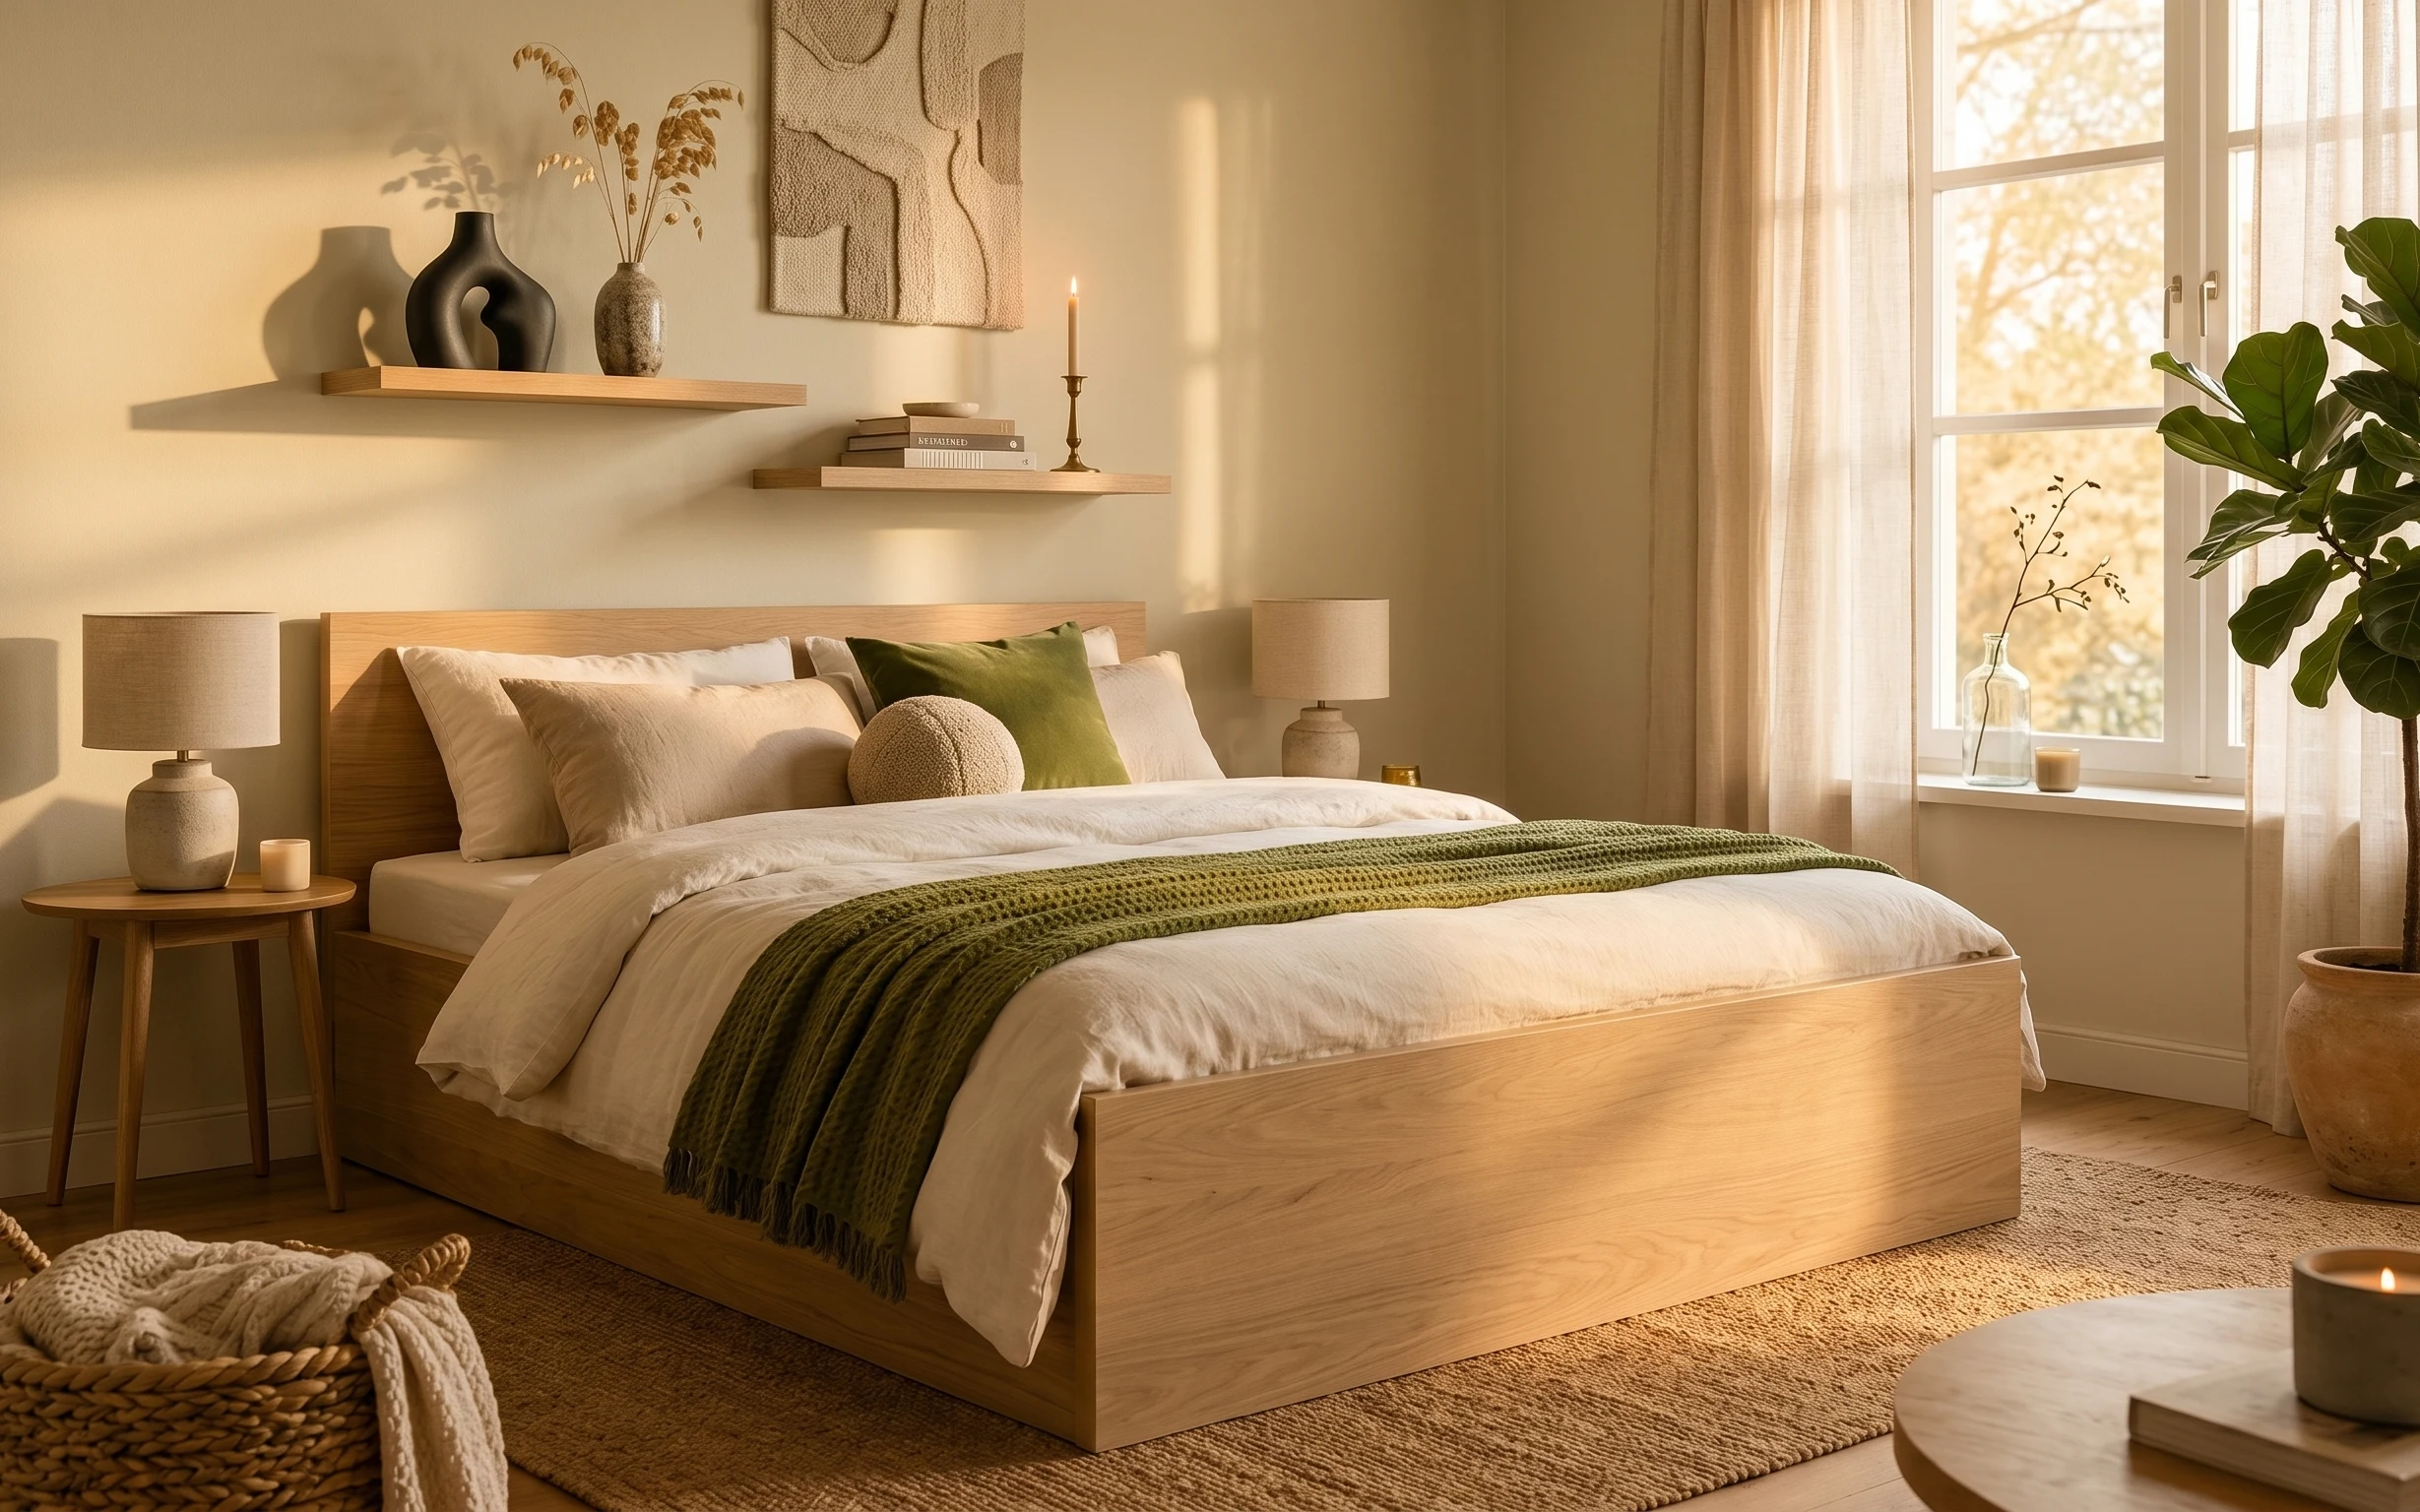
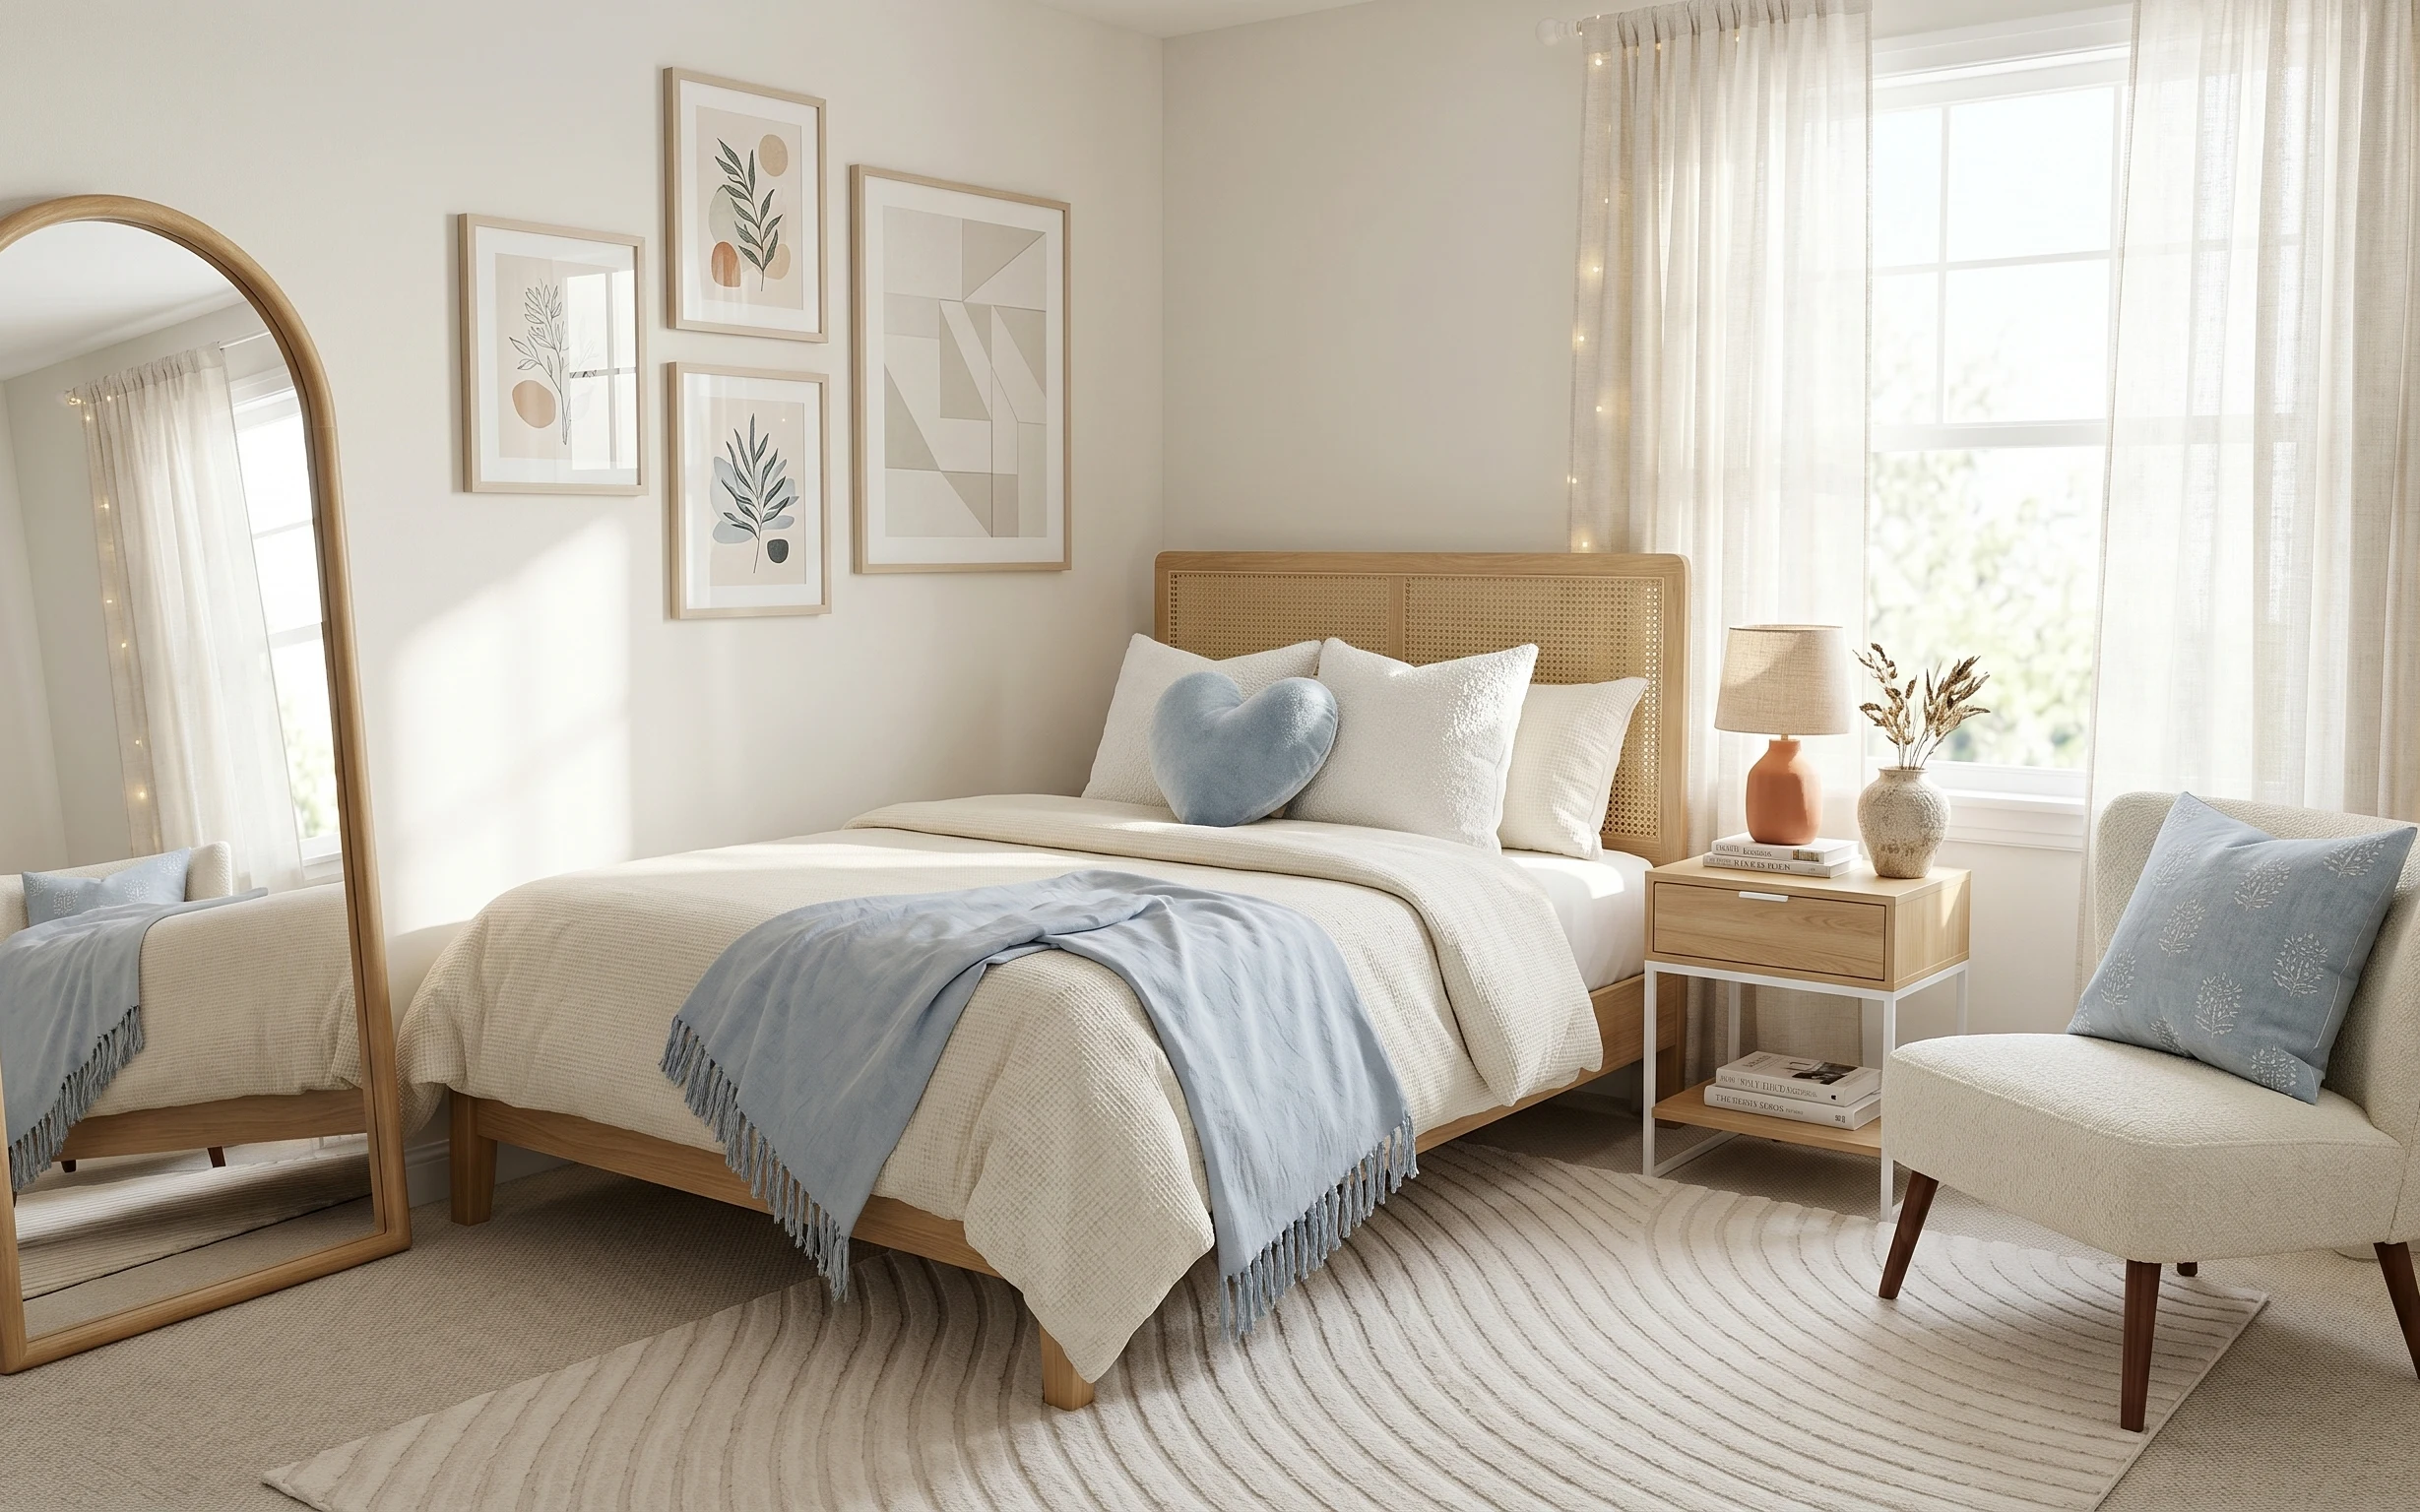
That soft, lived-in look in the photo isn’t about perfect matching—it’s about repeating a few textures: a chunky-knit green throw, a matte-looking framed print, and warm wood surfaces under daylight. The olive accents land because they’re used on flexible items (pillow and throw) instead of fixed finishes. Even the light feels layered: a fabric lampshade for evening softness plus candle glow in the background. This is achievable for shared housing because every swap is portable—most of it rolls, folds, or packs into a couple cardboard boxes.
I used to chase the “all-in-one” set—same color lamp, same shade, same frame size—then I’d move and realize half the collection didn’t work in the new layout. What changed my approach was sticking to one repeat color family (olive + cream) and one repeat texture (textile). In rentals, that’s the shortcut: you buy fewer things, but you reuse the visual theme everywhere it will actually travel.
Layer 1 — Area rug ($200) anchors the bed-to-floor transition
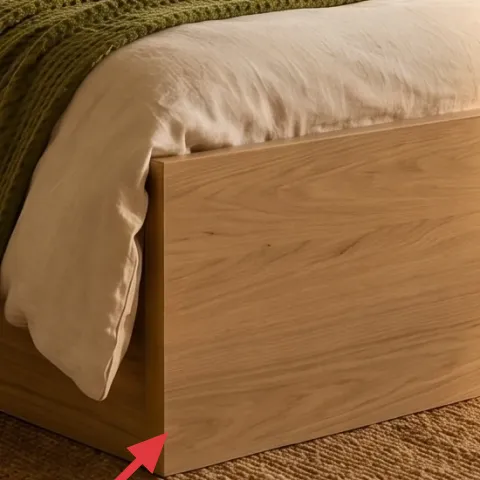
The area rug is the foundation here, and it matters more than people think for a move-friendly bedroom. In the photo, the rug covers the zone in front of the bed so white bedding doesn’t feel like it’s floating over bare floor. A 5×7-ish look also gives you an easy “landing strip” for a bedside moment—lamp + pillow + a place for your feet after the shower. The trade-off is that rugs can look pricey at checkout, but you’ll pack it into a roll (with zero hardware) and reuse it across apartments.
Rug-first rule
If the rug can’t fit through the door in one piece, choose the next size down—then plan rug pad separately or keep it minimal.
Layer 2 — Green throw blanket ($25) adds olive texture without fixed changes
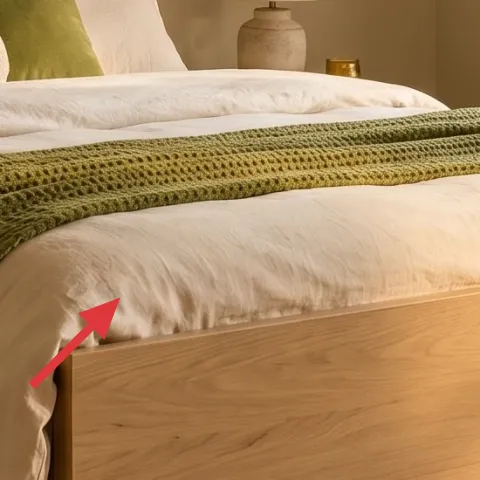
The green throw blanket is the easiest way to pull the palette into your space because it’s flexible and folds down fast. Here it sits draped across the front edge of the bed, where it visually bridges the white bedding and the olive pillow behind it. That “layer” look usually takes a lot longer if you try to match wall color or bed linens—so this is the opposite: change only the textiles that travel. The trade-off is you’ll need to re-place it when you remake the bed, but that’s a five-second routine compared to anything permanent.
Why it reads “intentional”
A solid color throw works like a tint layer; it looks styled even when the rest of the bed is simple.
Layer 3 — Green accent pillow ($12) repeats the throw for a calmer rhythm
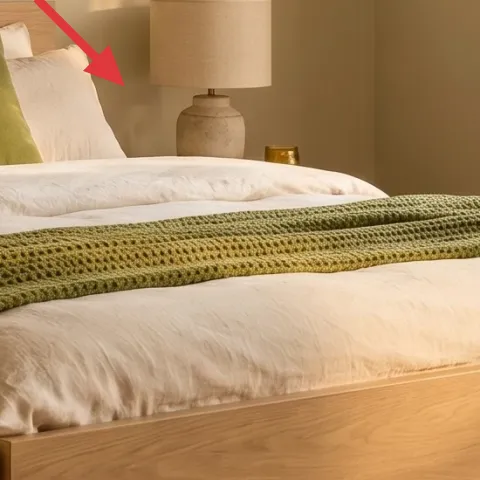
The green accent pillow is small, but it’s doing big work: it repeats the throw’s color and gives the eye a stop point near the center of the bed. In the hero image, it’s tucked among white pillows, which keeps everything bright while still adding contrast. Buying one pillow cover (rather than committing to an entirely new bedding set) is the rental-friendly move because you can keep the covers and swap the inserts over time. The trade-off is comfort—some covers look great but feel scratchy, so prioritize soft fabric you’ll actually want to lean into.
Match by hue, not fabric pattern
Try to keep the olive family consistent; the exact fabric weave can differ and still look cohesive.
Layer 4 — Table lamp on bedside table ($25) creates warm, moveable light
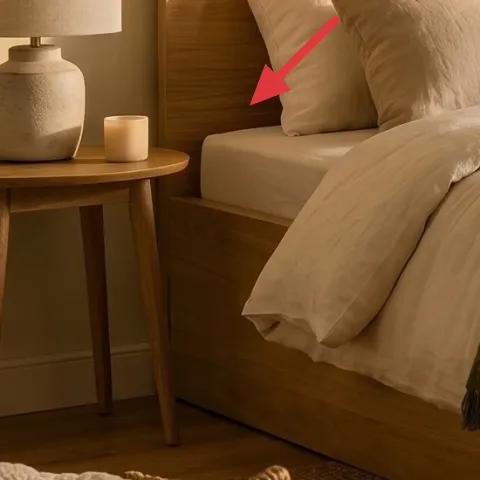
A table lamp gives you that evening softness without touching the wiring in the wall. In the photo, the fabric shade keeps the light diffused, and the wood bedside table ties it back to the bed frame. For shared housing, the best part is that this is truly portable: unplug it, wrap it, and go. The trade-off is bulb color—if you use a cool LED, the look will turn clinical fast, so pick a warm bulb that mimics candlelight warmth. This choice also prevents the “only overhead lighting” problem that makes bedrooms feel like waiting rooms.
Don’t rely on daylight alone
If you don’t plan a warm lamp source, the olive textiles can start reading muddy after dark.
Layer 5 — Framed abstract wall art ($25) adds one focal moment over the bed

The framed abstract wall art adds structure above the bed, and it’s the easiest way to make a rented wall feel considered. In the hero, the print sits off to the left and balances the bed’s width, so the wall doesn’t feel blank even with minimal styling. The key rental advantage is that a small frame can be hung with renter-safe methods and taken down quickly at move-out. The trade-off is choosing size: if it’s too small, it looks like a random purchase; if it’s close to the bed width, it reads like a planned focal point.
Keep it lightweight
Small frames are easier to pack flat—heavy art fights you during moves.
Layer 6 — Tall potted plant with broad leaves ($30) brings “real life” to the corner
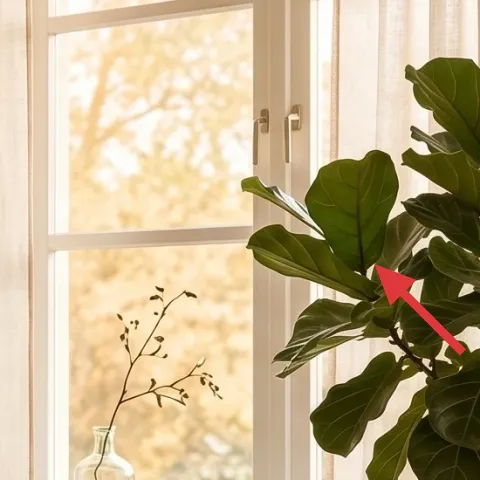
The tall potted plant gives the room that relaxed, lived-in edge without adding clutter. In the photo, it’s placed by the window, so the leaves catch daylight and create depth—almost like a soft screen behind the bed. For renters, the plant is a “use it everywhere” buy: it goes from corner to corner as your layout changes. The trade-off is maintenance; if the plant doesn’t match your actual light levels, it becomes a sad decoration. Still, for most shared-housing schedules, a sturdy broad-leaf plant is one of the most forgiving visual upgrades.
Quarantine your plant
Keep it in the brightest spot in the room first, then rotate weekly so it doesn’t lean.
Layer 7 — Candle ($35) adds that soft, golden bedside glow
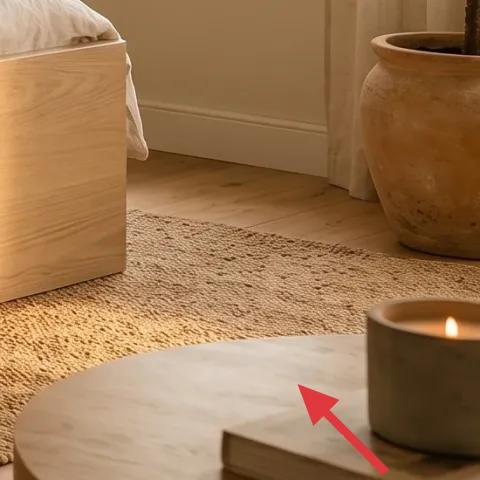
Candlelight is a styling cheat code for bedrooms because it changes the mood instantly and doesn’t require any structural changes. In the hero, the candle sits in the foreground, where it warms up the scene and complements the lamp’s fabric glow. For move-friendly decorating, this works because you can pack the container and keep the look consistent across apartments. The trade-off is safety and burn time—candles are best as a “cozy for now” element, not a permanent night-light replacement.
Make it instead of buying it
This candle pour duplicates the warm glow effect with a simple container pour—no hardware, and it packs the same way.
Materials
- Soy wax flakes — enough for 1 small candle — store craft section — $12
- Wick kit (1 wick + tab) — 1 set — craft store — $3
- Basic fragrance oil — small bottle — craft store — $2
- Popsicle sticks or chopstick (stir + center wick) — 1 pack — dollar store — $2
- Container (small jar or reuse) — 1 — thrift or reuse — $1
Steps
- Set up your container on a level surface and position the wick centered (tab anchored to the bottom).
- Measure wax amount for your container and melt wax in a microwave-safe measuring cup.
- Stir in fragrance oil once the wax is fully melted and smooth.
- Pour wax slowly into the container, keeping the wick straight.
- Let the candle cool undisturbed until fully set.
- Trim the wick to about 1/4 inch and let it cure for a short cool-down period before first burn.
Total DIY cost: $20 — saves about $15 over buying.
The cost, layer by layer
| Layer | Item | Cost |
|---|---|---|
| 1 | Area rug | $200 |
| 2 | Green throw blanket | $25 |
| 3 | Green accent pillow cover | $12 |
| 4 | Table lamp on bedside table | $25 |
| 5 | Framed abstract wall art | $25 |
| 6 | Tall potted plant with broad leaves | $30 |
| 7 | Candle | $35 |
| Total | $352 | |
If you want a cheaper variant, start with the textiles: swap in a thicker olive throw and a green pillow cover, then choose a smaller-area rug that still reaches under the bed’s front edge. Keep the framed art simple (a smaller print) and skip the tall plant for a tabletop version until the next budget reset.
What worked, what didn't (across the whole room)
This bedroom refresh works because it repeats one color family (olive + cream) across moveable items and anchors the scene with one larger base layer. The best results come from texture layering—throw + pillow + rug—and warm lighting that doesn’t depend on overhead fixtures.
What worked
- The area rug defines the “bed zone,” so the wood floor doesn’t compete with the bedding.
- Green throw placement across the bed edge creates depth without changing any fixed items.
- The green accent pillow repeats the throw’s hue and keeps the palette from feeling random.
- The table lamp’s fabric shade softens shadows and makes evenings feel calmer.
- The framed abstract print gives the wall a focal point instead of leaving a blank stretch.
- The tall potted plant adds vertical shape near the window for a less flat look.
What didn't
- If the olive items drift too dark, the room can start reading heavy instead of airy.
- A cool-toned lamp bulb flattens the textures and makes white bedding look more stark.
- Oversized wall art can feel cramped above a smaller bed footprint.
- Skipping the rug makes the lamp and bed look disconnected from the rest of the floor.
- If the candle scent is too strong, it overwhelms the soft, neutral palette.
What we'd skip if we did it again
Skip buying multiple matching bedding pieces at once. In rentals, the layout changes first—so repeat the palette through pillows and throws instead, then keep the rest simple enough to pack.
Skip a tall plant if natural light in your window is inconsistent. A healthy plant is worth it, but a struggling one steals the “calm” vibe and turns into a chore mid-semester.
Skip cool-white bulbs in the table lamp. Warm light is a major part of why olive looks rich instead of muddy, and it’s the easiest budget lever to pull.
Frequently asked
How long does it take to style this bedroom look?
Plan for about 90 minutes once everything is at home: lay down the rug first, then place the throw and pillows, set the lamp, and add the framed wall piece and plant. The “timed” part is usually waiting to arrange the bed after the rug is in place. If you DIY the candle, the pour takes less than an hour, but you’ll want extra cooling/cure time before burning.
Will this work in a smaller or awkward bedroom?
Yes—just scale the rug and the framed art without changing the idea. Keep the rug long enough to sit under at least the bed’s front edge and one side, so the bed feels grounded. For the wall art, go smaller or shift it slightly left/right to match your bed width. The portable pieces—throw, pillow cover, lamp, and plant—can all move with the layout.
What if my room is larger and needs more visual weight?
Add one additional pillow cover in the same olive family or choose a slightly larger rug so the bed doesn’t feel isolated. Keep the framed art proportional to the bed and avoid stacking too many objects on surfaces. The goal is repetition, not clutter—so adding one more matching textile piece is usually enough.
Where’s the best place to shop for these exact pieces on a budget?
For textiles and lighting, look for deals on area rugs, throw blankets, and table lamps at discount home stores and marketplaces with easy returns. For the framed abstract art, search for “framed art print” in small sizes so it matches the bed scale. For the plant, check local nurseries or grocery floral sections—then confirm it’s in strong, healthy condition before buying.
What’s the biggest mistake people make with this bedroom style?
Buying items in the right colors but wrong textures. Olive can look either rich or flat depending on fabric weight and weave, and white bedding can skew icy if the lamp bulb is cool. Another common miss is spacing: if the rug is too small or the framed art is too tiny above the bed, the room loses the intentional “designed” geometry.
Is candlelight okay in a shared housing bedroom?
It can be, as long as the candle is stable, placed on a heat-safe surface, and never left unattended. In shared spaces, stick to short sessions and consider scents that are mild and not overpowering. If the shared household has allergies or scent sensitivity, you can skip fragrance and keep the same look using a simple unscented pour.
More in Bedroom
Under $400: move-ready bedroom refresh with 7 easy swaps
A move-friendly bedroom refresh that leans into olive-and-cream textures and warm light, built for renters and shared housing. This plan us…

Under $500: beige-and-rust bedroom sanctuary refresh
A move-friendly bedroom sanctuary refresh built around warm string lights, layered neutrals, and framed art that packs into boxes. This pla…
Under $700: sleeping corner refresh with 7 weekend upgrades
A bright, light-blue-and-cream sleeping corner gets a bigger-feeling look with 7 budget-friendly weekend upgrades. The biggest wins come fr…